If you’re looking for an easy weeknight dinner that tastes like it came straight from your favorite Asian restaurant, this honey garlic chicken thighs recipe is about to become your new go-to meal. I discovered the magic of cooking with chicken thighs years ago, and once I perfected this sticky honey garlic glaze, I never looked back. The combination of sweet honey, pungent garlic, and tender, juicy thighs creates a dish that’s simultaneously elegant enough for company and simple enough for a Tuesday night.
What makes honey garlic chicken thighs so special is how the sauce caramelizes beautifully in the skillet, coating each piece with a glossy, golden finish. Unlike chicken breasts that can dry out in seconds, thighs stay incredibly moist and flavorful, making this a truly forgiving dish even for newer cooks. The best part? You can have this 30 minute chicken dinner on the table in less time than it takes to order takeout.
This garlic honey chicken skillet is also incredibly versatile—you can bake it, pan-sear it, or even throw it in a slow cooker. I’ve included all my favorite variations and pro tips below so you can make this recipe your own.
Why You’ll Love This Honey Garlic Chicken Thighs Recipe
- Juicy, Tender Meat: Chicken thighs have more fat content than breasts, keeping them succulent and flavorful throughout cooking, even if you accidentally leave them in a few minutes longer.
- Restaurant-Quality Flavor: The sticky honey garlic sauce is simple to make but tastes like it came from a professional kitchen, impressing family and friends alike.
- Quick & Easy Weeknight Dinner: Ready in under 35 minutes from start to finish, this one-pan chicken thighs recipe fits perfectly into busy schedules without sacrificing quality.
- Budget-Friendly: Chicken thighs are typically less expensive than breasts while offering superior taste and texture, making this an economical choice for feeding a family.
- Naturally Gluten-Free Option: With just a few ingredient swaps, you can easily make this garlic honey chicken gluten-free, accommodating various dietary preferences.
- Meal Prep Friendly: These sticky honey garlic chicken thighs reheat beautifully, making them perfect for preparing ahead for busy days or packing into lunch containers.
Ingredients You’ll Need
The beauty of this honey garlic chicken thighs recipe lies in its simplicity—you likely have most ingredients in your pantry right now. I use a combination of fresh garlic, honey, soy sauce, and a touch of acid to balance the sweetness, creating a sauce that’s complex yet straightforward to prepare. The key is using quality ingredients; fresh garlic makes a noticeable difference compared to jarred, and I recommend splurging on good honey if you can.
For the chicken itself, I always prefer bone-in, skin-on thighs when possible. The bones add incredible flavor to the sauce, and the skin crisps up beautifully when seared properly. However, boneless, skinless thighs work wonderfully too if that’s what you have on hand. I’ve included measurements for both the sauce components and optional garnishes to help you customize this garlic honey chicken to your taste preferences.
For the Chicken & Searing
- 8 thighs bone-in, skin-on chicken thighs (about 3 pounds; pat dry before cooking)
- 1 teaspoon salt (divided)
- 1/2 teaspoon black pepper (freshly ground)
- 1 tablespoon olive oil (for searing)
For the Honey Garlic Sauce
- 8 cloves garlic (minced fresh; this is essential for flavor)
- 1/3 cup honey (raw honey preferred)
- 1/4 cup soy sauce (low-sodium reduces saltiness)
- 2 tablespoons rice vinegar (or apple cider vinegar)
- 1 tablespoon water (helps dilute sauce slightly)
- 1 teaspoon sesame oil (optional but adds authentic Asian flavor)
- 1/2 teaspoon red pepper flakes (adjust to spice preference)
For Finishing
- 2 tablespoons green onions (sliced, for garnish)
- 1 tablespoon sesame seeds (white or black for garnish)
Optional Add-ins:
- ginger
- cornstarch
- Sriracha
- orange zest
How to Make Honey Garlic Chicken Thighs Recipe (Step-by-Step)
1. Prepare the Chicken
Remove chicken thighs from refrigerator 15-20 minutes before cooking to bring them to room temperature. This ensures even cooking throughout. Pat them completely dry with paper towels—this step is crucial for achieving crispy skin. Season all sides generously with salt and black pepper.
Pro tip: Dry chicken is the secret to golden, crispy skin. Don’t skip patting them dry!
2. Make the Honey Garlic Sauce
While the chicken comes to room temperature, whisk together the minced garlic, honey, soy sauce, rice vinegar, water, sesame oil (if using), and red pepper flakes in a small bowl. Stir until the honey is fully dissolved and the mixture is well combined. Taste and adjust seasonings—you want a balance of sweet, salty, and tangy.
Pro tip: Make the sauce ahead of time; it keeps in the fridge for up to 3 days, making this a great meal prep recipe.
3. Sear the Chicken
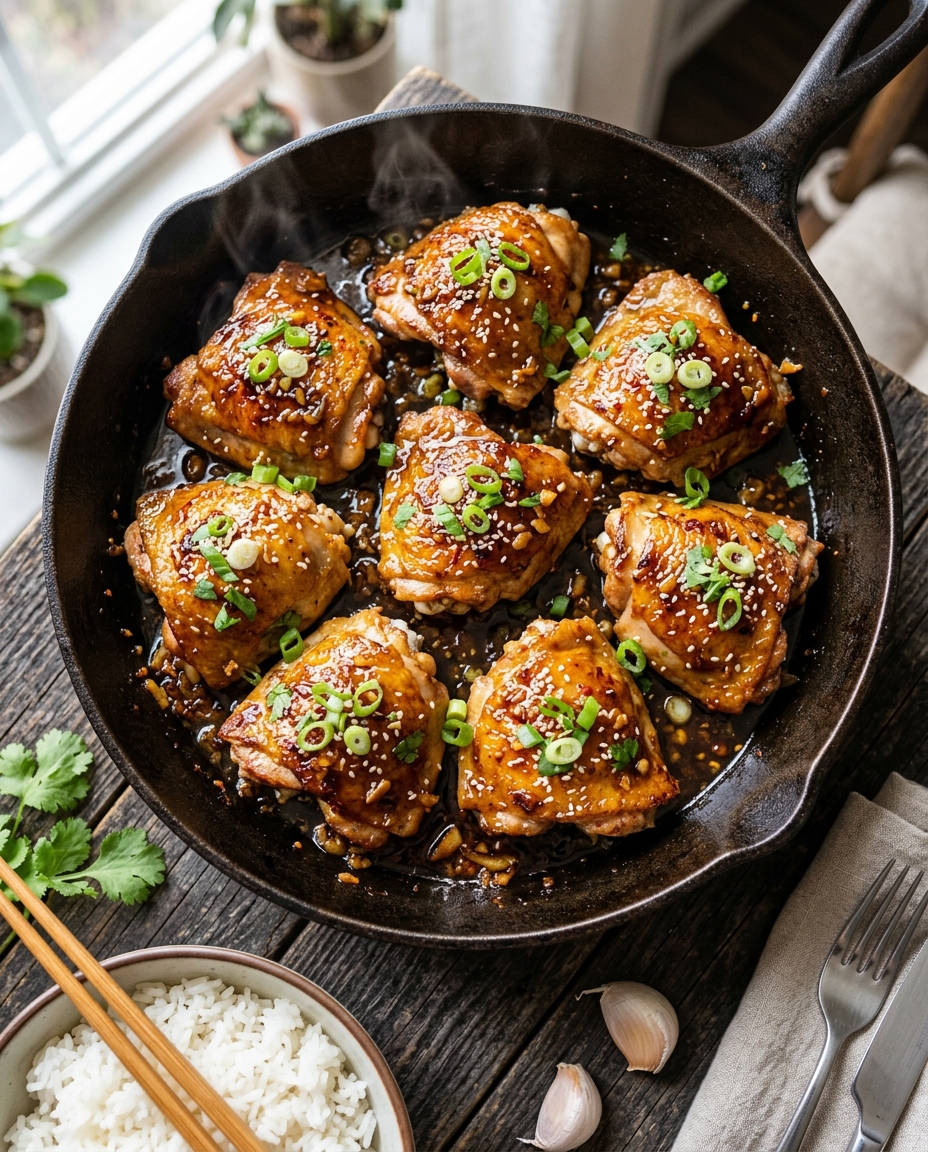
Heat olive oil in your large skillet over medium-high heat until it shimmers, about 1-2 minutes. Carefully place the chicken thighs skin-side down in the hot skillet. Do not move them for 5-6 minutes—you want that skin to develop a beautiful golden-brown crust. You should hear a satisfying sizzle when they hit the pan.
Pro tip: Resist the urge to move the chicken around! Let the skin make contact with the hot pan for maximum crispiness.
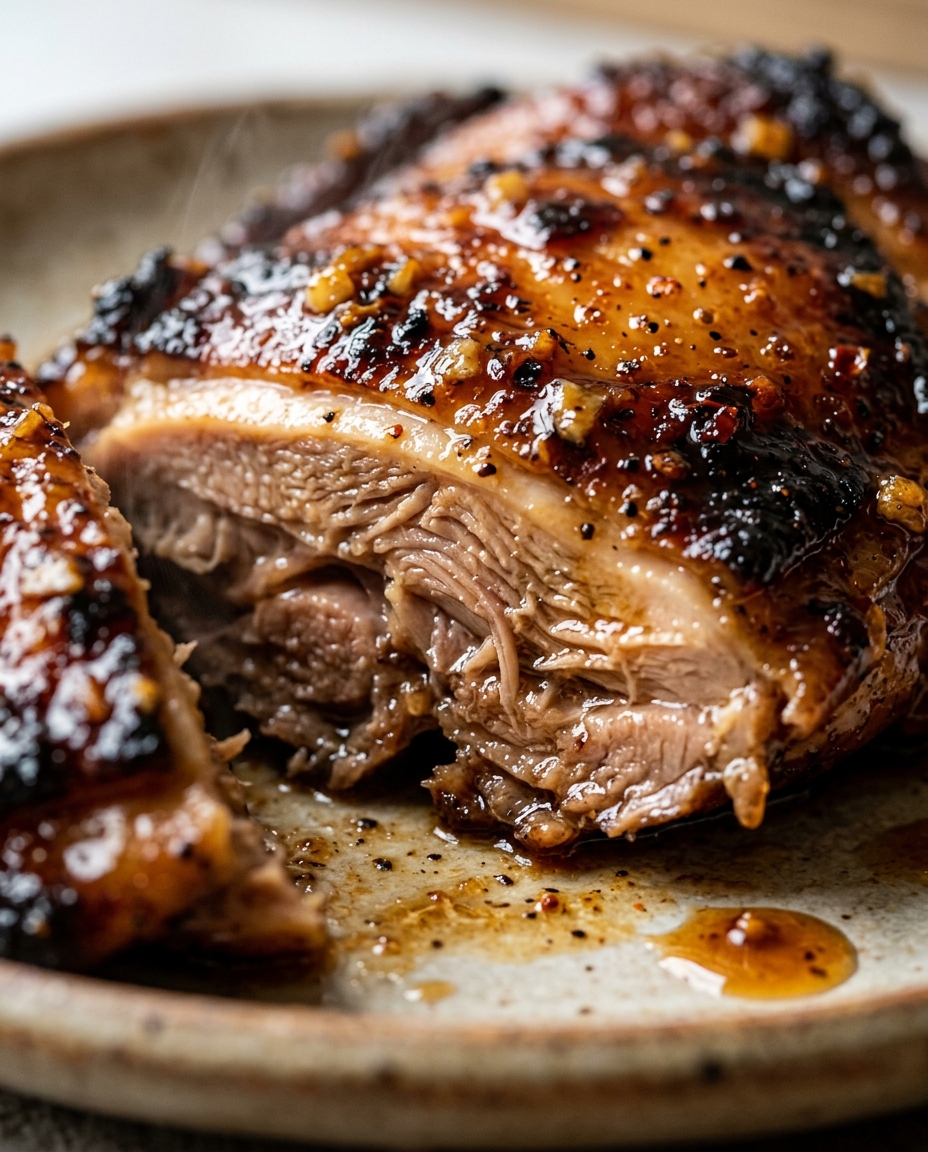
Flip the chicken thighs to the skin-side up position. Sear for another 3-4 minutes until the bottom is golden and the internal temperature reaches 165°F when measured with a meat thermometer in the thickest part of the thigh (not touching bone).
Pro tip: Use tongs to flip gently so you don’t tear the delicate skin you just crisped up.
4. Build the Glaze
Pour your prepared honey garlic sauce over and around the cooked chicken thighs in the skillet. Tilt the pan slightly to distribute the sauce evenly. Bring the sauce to a gentle simmer over medium heat, then reduce heat to medium-low. Let it bubble gently for 3-5 minutes.
Pro tip: This is where the magic happens—the sauce caramelizes and becomes thick and sticky, coating every piece of chicken.
As the sauce reduces, tilt the skillet occasionally and spoon the sauce over the top of the chicken thighs. This helps create that gorgeous glossy coating. The sauce should reduce by about half and look thick and syrupy. When you draw a spoon through it, it should leave a trail.
Pro tip: Watch the heat carefully during this step. Too high and the sauce burns; too low and it doesn’t reduce properly.
5. Rest and Finish
Remove the skillet from heat. Let the honey garlic chicken thighs rest for 2-3 minutes. This allows the residual heat to finish cooking and the sauce to set slightly. Transfer to a serving platter, drizzling extra sauce from the skillet over the top.
Pro tip: Don’t skip the resting period—it makes a difference in how tender the chicken becomes.
Garnish generously with sliced green onions and sesame seeds. The green onions add a fresh bite that balances the sweetness of the glaze, while sesame seeds add a subtle nutty crunch and visual appeal.
Pro tip: Fresh garnishes elevate this from weeknight dinner to something special. They’re worth the extra minute!
6. Alternative Baking Method
If you prefer a less hands-on approach, you can bake this instead. After searing the chicken skin-side up in an oven-safe skillet, pour the honey garlic sauce over top. Bake uncovered at 400°F for 15-18 minutes until the internal temperature reaches 165°F. The sauce won’t reduce as much as stovetop cooking, so if you prefer a thicker glaze, simmer it for 2-3 minutes on the stovetop after baking.
Pro tip: This baking method is perfect when you’re cooking for a crowd or want to free up your stovetop for side dishes.
Honey Garlic Chicken Thighs Recipe – Full Recipe
Honey Garlic Chicken Thighs Recipe
Ingredients
Equipment
Method
- Remove chicken thighs from refrigerator 15-20 minutes before cooking to bring them to room temperature. This ensures even cooking throughout. Pat them completely dry with paper towels—this step is crucial for achieving crispy skin. Season all sides generously with salt and black pepper. Pro tip: Dry chicken is the secret to golden, crispy skin. Don't skip patting them dry!
- While the chicken comes to room temperature, whisk together the minced garlic, honey, soy sauce, rice vinegar, water, sesame oil (if using), and red pepper flakes in a small bowl. Stir until the honey is fully dissolved and the mixture is well combined. Taste and adjust seasonings—you want a balance of sweet, salty, and tangy. Pro tip: Make the sauce ahead of time; it keeps in the fridge for up to 3 days, making this a great meal prep recipe.
- Heat olive oil in your large skillet over medium-high heat until it shimmers, about 1-2 minutes. Carefully place the chicken thighs skin-side down in the hot skillet. Do not move them for 5-6 minutes—you want that skin to develop a beautiful golden-brown crust. You should hear a satisfying sizzle when they hit the pan. Pro tip: Resist the urge to move the chicken around! Let the skin make contact with the hot pan for maximum crispiness.
- Flip the chicken thighs to the skin-side up position. Sear for another 3-4 minutes until the bottom is golden and the internal temperature reaches 165°F when measured with a meat thermometer in the thickest part of the thigh (not touching bone). Pro tip: Use tongs to flip gently so you don't tear the delicate skin you just crisped up.
- Pour your prepared honey garlic sauce over and around the cooked chicken thighs in the skillet. Tilt the pan slightly to distribute the sauce evenly. Bring the sauce to a gentle simmer over medium heat, then reduce heat to medium-low. Let it bubble gently for 3-5 minutes. Pro tip: This is where the magic happens—the sauce caramelizes and becomes thick and sticky, coating every piece of chicken.
- As the sauce reduces, tilt the skillet occasionally and spoon the sauce over the top of the chicken thighs. This helps create that gorgeous glossy coating. The sauce should reduce by about half and look thick and syrupy. When you draw a spoon through it, it should leave a trail. Pro tip: Watch the heat carefully during this step. Too high and the sauce burns; too low and it doesn't reduce properly.
- Remove the skillet from heat. Let the honey garlic chicken thighs rest for 2-3 minutes. This allows the residual heat to finish cooking and the sauce to set slightly. Transfer to a serving platter, drizzling extra sauce from the skillet over the top. Pro tip: Don't skip the resting period—it makes a difference in how tender the chicken becomes.
- Garnish generously with sliced green onions and sesame seeds. The green onions add a fresh bite that balances the sweetness of the glaze, while sesame seeds add a subtle nutty crunch and visual appeal. Pro tip: Fresh garnishes elevate this from weeknight dinner to something special. They're worth the extra minute!
- If you prefer a less hands-on approach, you can bake this instead. After searing the chicken skin-side up in an oven-safe skillet, pour the honey garlic sauce over top. Bake uncovered at 400°F for 15-18 minutes until the internal temperature reaches 165°F. The sauce won't reduce as much as stovetop cooking, so if you prefer a thicker glaze, simmer it for 2-3 minutes on the stovetop after baking. Pro tip: This baking method is perfect when you're cooking for a crowd or want to free up your stovetop for side dishes.
Notes
- Pat chicken completely dry before searing for crispy, golden skin—moisture is the enemy of crispiness
- Use fresh minced garlic rather than jarred; the flavor difference is noticeable and worth the extra minute
- Make the honey garlic sauce ahead and refrigerate up to 3 days for easy meal prep
Tips for the Best Honey Garlic Chicken Thighs Recipe
- Use Fresh Garlic: The difference between fresh minced garlic and pre-minced is noticeable in this recipe. Fresh garlic creates a more vibrant, nuanced flavor in the honey garlic sauce that jarred versions can’t match.
- Don’t Skip Drying the Chicken: Moisture is the enemy of crispy skin. Pat your chicken thighs thoroughly dry before they hit the pan, and you’ll be rewarded with crackling, golden skin.
- Medium-High Heat is Your Friend: For this garlic honey chicken skillet, medium-high heat during searing ensures proper browning without burning the sauce. Too low and your skin won’t crisp; too high and your sauce will scorch.
- Make It Less Sweet: If you find honey overpowering, reduce it to 1/4 cup and add an extra tablespoon of soy sauce. Everyone’s sweetness preference is different, so taste and adjust accordingly.
- Batch Cooking for Meal Prep: This one pan chicken thighs recipe doubles beautifully. Make two skillets at once and portion the cooled thighs with sauce into containers. They keep for 4 days in the fridge and reheat perfectly in a 350°F oven.
- Temperature Matters More Than Time: Chicken thigh doneness is best determined by internal temperature (165°F), not by guessing minutes. Different skillet sizes and heat sources vary greatly, so use a meat thermometer for foolproof results every time.
Variations to Try
- Spicy Sriracha Version: Add 1-2 teaspoons of Sriracha to the honey garlic sauce for a Korean-inspired kick. The heat complements the sweetness beautifully and makes this sticky honey garlic chicken perfect for spice lovers.
- Orange Glazed Chicken Thighs: Add 2 tablespoons of fresh orange juice and 1/2 teaspoon of orange zest to the sauce. The citrus brightness creates a sophisticated variation that pairs wonderfully with rice and roasted vegetables.
- Ginger-Garlic Version: Include 1 tablespoon of minced fresh ginger in the sauce for added warmth and complexity. This variation is particularly delicious served over jasmine rice.
- Slow Cooker Honey Garlic Chicken: Skip the searing step and add all raw chicken thighs to a slow cooker with the sauce. Cook on low for 4-5 hours or high for 2-3 hours. The meat will be incredibly tender, though you’ll miss the crispy skin.
- Asian Chicken Thighs with Mushrooms: Add 2 cups of sliced mushrooms (cremini, shiitake, or oyster) to the skillet when you add the sauce. The mushrooms absorb the honey garlic flavors and add wonderful umami depth to this easy chicken thighs recipe.
Storage and Meal Prep Tips
- Refrigerator Storage: Store cooled honey garlic chicken thighs with their sauce in an airtight container for up to 4 days. The flavors actually deepen as they sit, making this perfect for meal prep.
- Freezing Instructions: Transfer completely cooled chicken and sauce to a freezer-safe bag or container. Lay flat to save space. Freeze for up to 2 months. Thaw overnight in the refrigerator before reheating.
- Reheating Method: Reheat gently in a 350°F oven for 10-15 minutes until warmed through, covered with foil to prevent drying out. Alternatively, reheat in a skillet over medium-low heat with a splash of water if the sauce has reduced too much. Avoid the microwave, which can make the chicken tough.
- Meal Prep Strategies: This garlic honey chicken skillet is ideal for meal prep. Portion cooked chicken with sauce into individual containers, then pair with your favorite sides each day. Great options include steamed rice, roasted broccoli, or a simple Asian cucumber salad.
- Freezing Raw Marinated Chicken: You can also marinate raw chicken thighs in the honey garlic sauce, freeze, and cook straight from frozen. Add 5-10 extra minutes to the cooking time and the flavor will be more intense.
Nutritional Benefits
Chicken thighs are nutritional powerhouses that often get overlooked in favor of breasts. The extra fat in thighs contains important vitamins and minerals, including selenium, which supports thyroid function, and B vitamins that aid in energy metabolism. The honey in this sauce provides natural sweetness without refined sugar, along with trace minerals and antioxidants. Garlic is a well-researched ingredient known for immune-supporting properties and anti-inflammatory compounds. When you combine these elements into honey garlic chicken thighs, you’re getting a balanced meal with protein, healthy fats, and beneficial plant compounds.
- High-Quality Protein: Each serving delivers approximately 35g of protein, essential for muscle maintenance and satiety throughout the day.
- Rich in B Vitamins: Chicken thighs are excellent sources of B6 and niacin, supporting energy production and nervous system health.
- Selenium Content: A mineral crucial for thyroid function and metabolism, chicken thighs provide about 30% of your daily needs per serving.
- Healthy Fats: The fat in chicken thighs includes both monounsaturated and polyunsaturated fats, supporting heart health and nutrient absorption.
- Natural Sweetness: Using honey instead of processed sugar provides a lower glycemic alternative with potential antioxidant benefits.
What to Serve With Honey Garlic Chicken Thighs Recipe
- Jasmine or Sushi Rice: Serve this sticky honey garlic chicken over fluffy jasmine rice to soak up every drop of that incredible sauce. White sushi rice also works beautifully and adds an authentic Asian restaurant feel.
- Stir-Fried Vegetables: Prepare a simple stir-fry with broccoli, snap peas, and bell peppers in a light garlic oil. The fresh vegetables provide a crisp contrast to the rich, glazed chicken thighs.
- Roasted Bok Choy and Carrots: Toss halved bok choy and sliced carrots with a bit of oil, salt, and pepper, then roast at 425°F for 15 minutes. This vegetable combination is both beautiful and nutritious alongside the honey garlic chicken.
- Cauliflower Rice for Low-Carb: If you’re watching carbs, serve this garlic honey chicken over cauliflower rice. The sauce complements the mild vegetable rice beautifully without adding extra carbohydrates.
- Cucumber and Sesame Salad: Make a quick salad with thinly sliced English cucumbers, rice vinegar, sesame oil, salt, and a sprinkle of sesame seeds. The cool, refreshing salad balances the warm, sweet chicken perfectly.
Frequently Asked Questions
Can I make honey garlic chicken thighs ahead of time?
Absolutely! You can prepare this dish up to 4 days in advance. Cook it completely, cool to room temperature, then store in an airtight container in the refrigerator. You can also marinate raw chicken thighs in the honey garlic sauce, freeze it, and cook straight from frozen (just add 5-10 minutes to cooking time). This makes it perfect for meal prep and busy weeknights.
What’s the best way to reheat honey garlic chicken thighs?
Reheat gently in a 350°F oven for 10-15 minutes, covered loosely with foil to prevent the exterior from drying out. This method preserves the crispy skin and tender meat. Alternatively, reheat in a skillet over medium-low heat with a splash of water if needed to loosen the sauce. Avoid using the microwave, as it tends to make the chicken tough and rubbery.
Can I use boneless, skinless chicken thighs instead of bone-in, skin-on?
Yes, boneless, skinless thighs work well, though you’ll miss out on the flavor the bones add to the sauce and the crispy skin texture. Boneless thighs cook slightly faster, so reduce the initial searing time to 3-4 minutes per side and check the internal temperature carefully. The sauce will still be delicious, and the meat will remain tender and juicy.
How do I make this recipe gluten-free?
This honey garlic chicken thighs recipe is naturally gluten-free if you use tamari or gluten-free soy sauce instead of regular soy sauce. All other ingredients—honey, garlic, vinegar, sesame oil, and chicken—are naturally gluten-free. Check your soy sauce label to confirm it’s certified gluten-free, as some brands may contain wheat.
Why is my sauce not getting thick and sticky?
The sauce needs adequate heat and time to reduce properly. Make sure your heat is high enough to create a gentle boil (not just a simmer), and give it at least 3-5 minutes to reduce by about half. If your sauce is still too thin after cooking, you can mix 1 tablespoon of cornstarch with 2 tablespoons of water to create a slurry, then stir it into the simmering sauce for a thicker consistency. Alternatively, simmer uncovered for an additional 2-3 minutes.
Final Thoughts
This honey garlic chicken thighs recipe has completely changed how I approach weeknight dinners. What started as a craving for restaurant-quality Asian food has become my most-requested meal by family and friends. The simplicity of the ingredient list combined with the sophisticated, restaurant-worthy results makes this one of my favorite recipes to share. Whether you’re a seasoned cook or just starting your kitchen journey, this garlic honey chicken skillet is forgiving enough to succeed and impressive enough to make you feel like a pro.
I love that this dish checks so many boxes: it’s quick enough for busy weeknights, elegant enough for entertaining, budget-friendly, and incredibly delicious. The fact that it reheats beautifully and improves with time makes it ideal for meal prep and batch cooking. Once you master this basic recipe, don’t be afraid to play with variations—add ginger, try spicy versions, throw in mushrooms, or make it in the slow cooker. The foundation is so solid that it adapts beautifully to your preferences and pantry staples.
Ready to Try It?
I genuinely believe you’re going to fall in love with this honey garlic chicken thighs recipe just like I have. The first time you pull a skillet of glossy, caramelized chicken from the stove, you’ll understand why this has become my go-to easy weeknight dinner. Don’t hesitate—grab your ingredients this week and make it happen. Then come back and let me know what you thought in the comments below. Did you add any of the variations? How did you serve it? Your feedback helps me create more recipes you’ll absolutely love. Happy cooking!