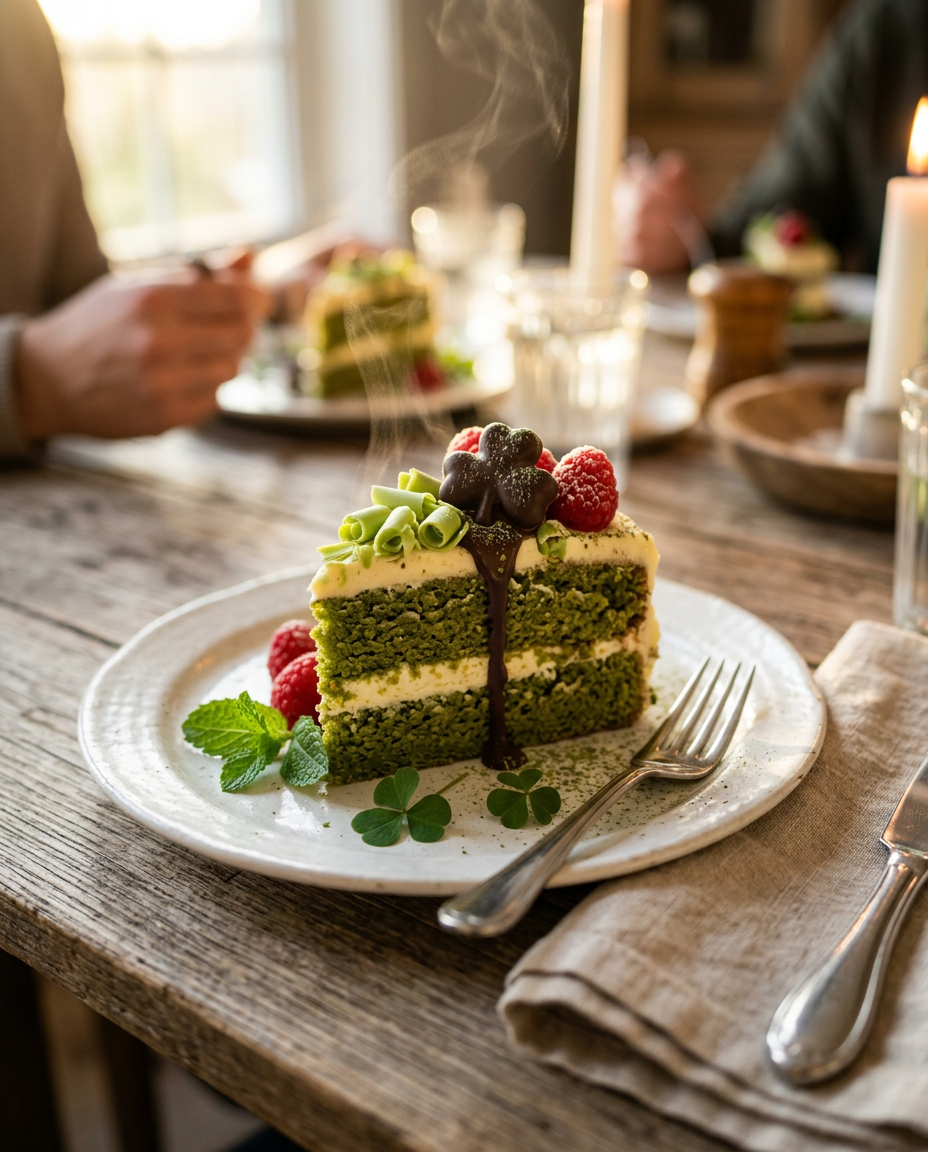
March brings the magic of St. Patrick’s Day, and nothing says celebration quite like a table full of vibrant St Patrick’s Day desserts! From emerald-hued cookies to decadent green velvet cakes, these festive treats will have everyone feeling lucky. Whether you’re hosting a party or just want to add some Irish flair to your dessert table, these 15 green treats are guaranteed crowd-pleasers.
I’ve been making these festive desserts for years, and there’s something truly special about watching faces light up when they see that perfect shade of green. These recipes range from simple no-bake treats perfect for busy weeknights to show-stopping cakes that’ll be the talk of your celebration. Let’s dive into this collection of emerald delights!
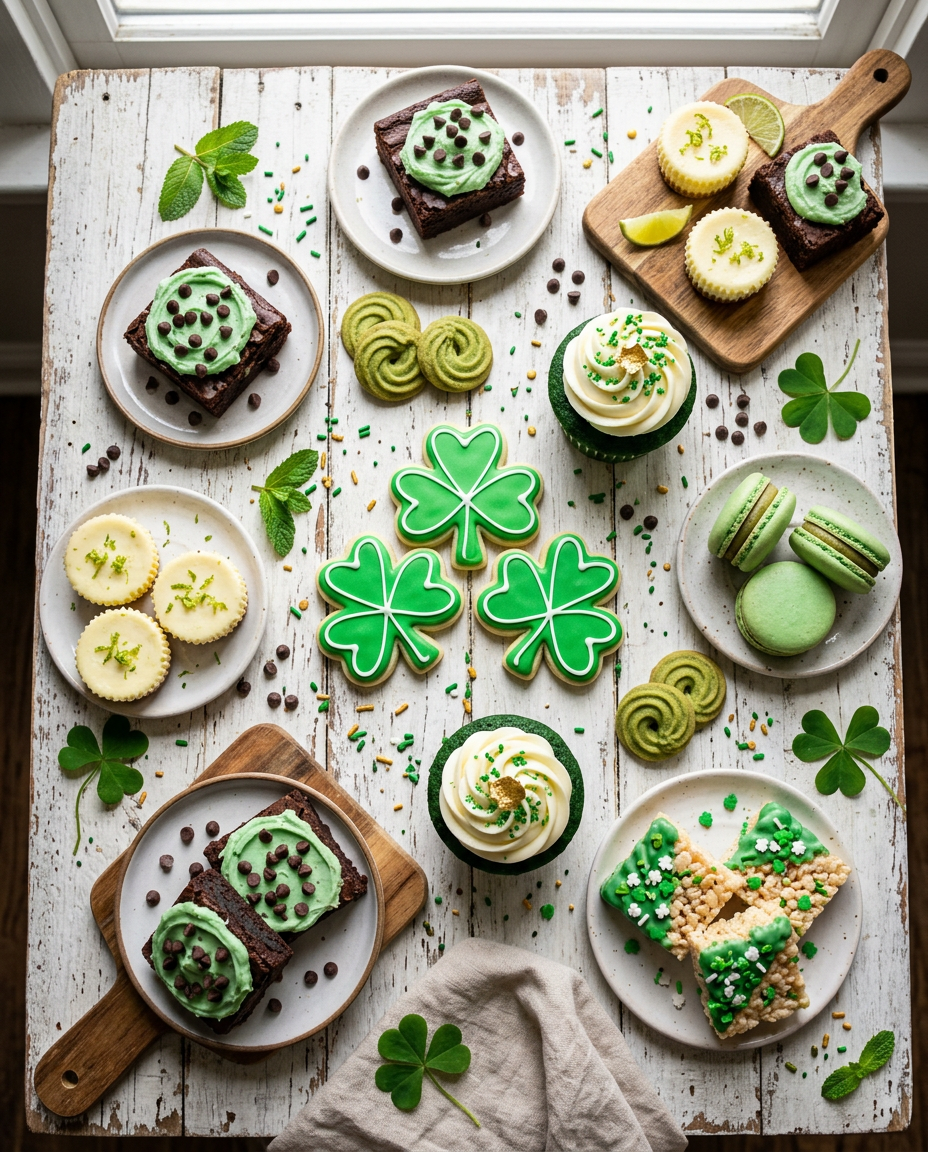
Why You’ll Love This 15 Best St Patrick’s Day Desserts to Celebrate in Green Style
- Festive and Fun: Each dessert brings that perfect pop of green color that makes St. Patrick’s Day celebrations extra special
- Variety for Everyone: From quick cookies to elaborate cakes, there’s something for every skill level and time constraint
- Kid-Friendly Options: Many of these treats are perfect for little hands to help make, creating wonderful family memories
- Make-Ahead Friendly: Most of these desserts can be prepared in advance, making party planning stress-free
- Budget-Friendly: Using simple pantry ingredients and food coloring, these treats won’t break the bank
- Crowd-Pleasing Flavors: Beyond just looking great, these desserts taste amazing with flavors like mint, vanilla, and chocolate
Ingredients You’ll Need
The beauty of these St Patrick’s Day desserts lies in their simplicity – most use common baking ingredients you likely already have on hand. The star ingredient is food coloring, preferably gel-based for vibrant colors without affecting texture. I recommend investing in good quality vanilla extract and butter, as these form the flavor foundation of many recipes.
Fresh ingredients like eggs, butter, and cream cheese should be brought to room temperature before baking for best results. Don’t forget specialty items like mini chocolate chips for shamrock cookies, cream cheese for frostings, and various extracts like mint or almond to create unique flavor profiles in your green treats.
Base Baking Essentials
- 4 cups all-purpose flour (sifted)
- 2 cups granulated sugar
- 1 cup unsalted butter (room temperature)
- 6 large eggs (room temperature)
- 2 teaspoons vanilla extract
- 2 teaspoons baking powder
- 1 teaspoon salt
Green Coloring & Flavoring
- 2 bottles green gel food coloring (various shades)
- 1 teaspoon mint extract (optional)
- 1 teaspoon almond extract (optional)
Frosting & Decoration
- 8 oz cream cheese (softened)
- 4 cups powdered sugar (sifted)
- 1/2 cup heavy cream
- 2 cups mini chocolate chips
- 1 cup sprinkles (green and white)
Optional Add-ins:
- coconut flakes
- crushed Oreo cookies
- white chocolate chips
- lime zest
How to Make 15 Best St Patrick’s Day Desserts to Celebrate in Green Style (Step-by-Step)
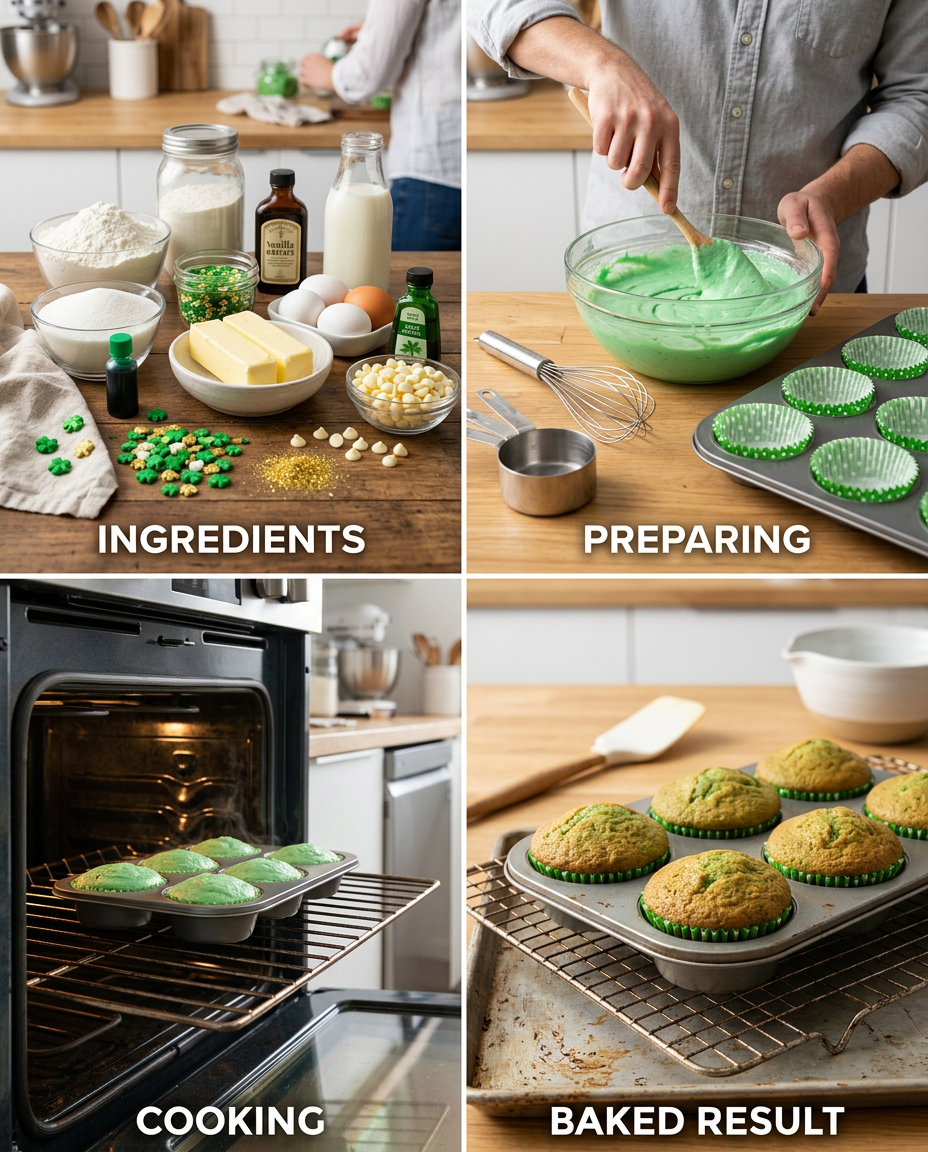
1. Prepare Your Workspace
Line all baking sheets with parchment paper and preheat ovens to specified temperatures for each recipe. Bring all dairy ingredients to room temperature, which typically takes 30-60 minutes.
Pro tip: Room temperature ingredients blend more easily and create better texture in your finished desserts.
Set up separate mixing stations for different colored batters if making multiple treats. Organize your food coloring, extracts, and decorating supplies within easy reach.
Pro tip: Having everything organized beforehand prevents accidentally adding wrong ingredients when working with multiple colored batters.
2. Master the Green Coloring Technique
Start with gel food coloring rather than liquid, using just a few drops at first. Mix thoroughly and gradually add more until you achieve your desired shade of green.
Pro tip: Colors often deepen as they sit, so start lighter than your target shade.
For natural green alternatives, try matcha powder for a subtle green, or spinach powder for vibrant color without strong flavor.
Pro tip: When using natural colorings, sift them first to prevent clumps in your batter.
3. Basic Cookie Preparation
Cream butter and sugar until light and fluffy, about 3-4 minutes. Add eggs one at a time, then vanilla and any extracts you’re using.
Pro tip: Don’t skip the creaming step – it creates the perfect cookie texture.
Gradually mix in dry ingredients until just combined. Divide dough if making multiple colors, then add food coloring to each portion.
Pro tip: Overmixing after adding flour can make cookies tough, so mix just until ingredients are combined.
4. Cake and Cupcake Basics
For green velvet cakes, follow red velvet technique but substitute green coloring. The slight tanginess from buttermilk and vinegar is key to the classic flavor.
Pro tip: Add food coloring after creaming wet ingredients but before adding dry ingredients for even distribution.
Fill cupcake liners only 2/3 full to prevent overflow, and rotate pans halfway through baking for even results.
Pro tip: Use an ice cream scoop for perfectly portioned cupcakes every time.
5. Frosting and Decoration Techniques
Beat cream cheese until smooth before adding any other ingredients. Gradually add powdered sugar to prevent lumps, then add coloring.
Pro tip: Cold cream cheese will create lumpy frosting, so ensure it’s properly softened.
Use different piping tips to create shamrock shapes, grass effects, or smooth finishes. Practice on parchment paper first if trying new techniques.
Pro tip: Chill decorated items for 15 minutes to set frosting before serving or stacking.
6. Assembly and Final Touches
Allow all baked items to cool completely before frosting or decorating. This prevents melting and sliding decorations.
Pro tip: Place cooled items in the refrigerator for 10 minutes before frosting for extra stability.
Add final decorative touches like sprinkles, chocolate chips for ‘dirt,’ or coconut flakes while frosting is still soft so they adhere properly.
Pro tip: Gently press decorations into soft frosting rather than just sprinkling on top for better adhesion.
15 Best St Patrick’s Day Desserts to Celebrate in Green Style – Full Recipe
15 Best St Patrick's Day Desserts to Celebrate in Green Style
Ingredients
Equipment
Method
- Line all baking sheets with parchment paper and preheat ovens to specified temperatures for each recipe. Bring all dairy ingredients to room temperature, which typically takes 30-60 minutes. Pro tip: Room temperature ingredients blend more easily and create better texture in your finished desserts.
- Set up separate mixing stations for different colored batters if making multiple treats. Organize your food coloring, extracts, and decorating supplies within easy reach. Pro tip: Having everything organized beforehand prevents accidentally adding wrong ingredients when working with multiple colored batters.
- Start with gel food coloring rather than liquid, using just a few drops at first. Mix thoroughly and gradually add more until you achieve your desired shade of green. Pro tip: Colors often deepen as they sit, so start lighter than your target shade.
- For natural green alternatives, try matcha powder for a subtle green, or spinach powder for vibrant color without strong flavor. Pro tip: When using natural colorings, sift them first to prevent clumps in your batter.
- Cream butter and sugar until light and fluffy, about 3-4 minutes. Add eggs one at a time, then vanilla and any extracts you're using. Pro tip: Don't skip the creaming step – it creates the perfect cookie texture.
- Gradually mix in dry ingredients until just combined. Divide dough if making multiple colors, then add food coloring to each portion. Pro tip: Overmixing after adding flour can make cookies tough, so mix just until ingredients are combined.
- For green velvet cakes, follow red velvet technique but substitute green coloring. The slight tanginess from buttermilk and vinegar is key to the classic flavor. Pro tip: Add food coloring after creaming wet ingredients but before adding dry ingredients for even distribution.
- Fill cupcake liners only 2/3 full to prevent overflow, and rotate pans halfway through baking for even results. Pro tip: Use an ice cream scoop for perfectly portioned cupcakes every time.
- Beat cream cheese until smooth before adding any other ingredients. Gradually add powdered sugar to prevent lumps, then add coloring. Pro tip: Cold cream cheese will create lumpy frosting, so ensure it's properly softened.
- Use different piping tips to create shamrock shapes, grass effects, or smooth finishes. Practice on parchment paper first if trying new techniques. Pro tip: Chill decorated items for 15 minutes to set frosting before serving or stacking.
- Allow all baked items to cool completely before frosting or decorating. This prevents melting and sliding decorations. Pro tip: Place cooled items in the refrigerator for 10 minutes before frosting for extra stability.
- Add final decorative touches like sprinkles, chocolate chips for 'dirt,' or coconut flakes while frosting is still soft so they adhere properly. Pro tip: Gently press decorations into soft frosting rather than just sprinkling on top for better adhesion.
Notes
- Gel food coloring works better than liquid for vibrant colors without affecting texture
- Most components can be made 2-3 days ahead and stored covered in refrigerator
- Natural green alternatives include matcha powder, spinach powder, or lime zest for those avoiding artificial coloring
Tips for the Best 15 Best St Patrick’s Day Desserts to Celebrate in Green Style
- Color Consistency: Mix all your green coloring at once and store in airtight containers to ensure consistent color across all your treats
- Natural Green Options: Matcha powder, spinach powder, or spirulina can provide natural green coloring, though flavors may vary
- Make-Ahead Strategy: Most cookies and cakes can be baked and frozen up to one month ahead, then thawed and decorated day-of
- Temperature Control: Keep decorated items refrigerated until serving, especially cream cheese frostings which can soften quickly
- Portion Control: Use cookie scoops or measuring cups for consistent sizing across all your treats
- Storage Solutions: Layer delicate decorated items between parchment paper in airtight containers to prevent sticking
Variations to Try
- Mint Chocolate Variation: Add mint extract and chocolate chips to any base recipe for refreshing mint chocolate treats
- Lime Coconut Twist: Incorporate lime zest and coconut flakes for tropical green desserts with natural flavor
- Matcha Green Tea: Substitute matcha powder for food coloring in cakes and cookies for authentic Japanese-inspired treats
- Pistachio Delight: Use pistachio pudding mix or ground pistachios for naturally green, nutty flavored desserts
- Shamrock Shake Inspired: Create mint and vanilla layered desserts mimicking the popular seasonal beverage
Storage and Meal Prep Tips
- Refrigerator Storage: Most frosted items keep 3-5 days covered in the refrigerator, bring to room temperature before serving
- Freezer Storage: Unfrosted cookies and cakes freeze up to 3 months wrapped tightly in plastic wrap and foil
- Room Temperature: Plain cookies can stay fresh 1 week in airtight containers at room temperature
- Reheating Instructions: Briefly warm items in 300°F oven for 5 minutes to refresh, but avoid reheating frosted items
- Make-Ahead Tips: Bake components up to 2 days ahead and store separately, then assemble and decorate day of serving
Nutritional Benefits
While these festive treats are designed for celebration rather than health, many can be modified to include beneficial ingredients. Using real vanilla extract provides antioxidants, while incorporating nuts adds healthy fats and protein.
- Natural colorings like matcha provide antioxidants and metabolism benefits
- Eggs contribute high-quality protein and essential amino acids
- Butter in moderation provides fat-soluble vitamins A, D, E, and K
- Adding nuts or seeds increases fiber, protein, and healthy fats content
- Using whole wheat flour substitutions can increase fiber and nutrients
What to Serve With 15 Best St Patrick’s Day Desserts to Celebrate in Green Style
- Irish Coffee: The perfect adult beverage to complement sweet green treats
- Cold Milk: Classic pairing that helps balance the sweetness of frosted desserts
- Vanilla Ice Cream: Serve warm treats with cold vanilla ice cream for temperature contrast
- Fresh Berries: Strawberries or raspberries add fresh flavor and beautiful color contrast
- Hot Chocolate: Rich, warming drink that pairs beautifully with mint-flavored treats
Frequently Asked Questions
Can I make St Patrick’s Day desserts without artificial food coloring?
Yes! Natural alternatives include matcha powder for green tea flavor, spinach powder (surprisingly flavorless), spirulina powder, or even pureed spinach. Lime zest also adds natural green color along with fresh citrus flavor. Keep in mind that natural colors may be more muted than artificial coloring.
How far in advance can I prepare St Patrick’s Day cookies and cakes?
Most cookies can be baked and stored in airtight containers for up to one week, or frozen for up to 3 months. Cakes can be baked and frozen (unfrosted) for up to one month. For best results, decorate items 1-2 days before serving and store them covered in the refrigerator.
What’s the best way to achieve vibrant green color in my desserts?
Gel food coloring works much better than liquid coloring because it doesn’t thin your batter and provides more concentrated color. Start with a small amount and gradually add more until you reach your desired shade. The color often deepens as it sits, so start slightly lighter than your target color.
Can I substitute ingredients to make St Patrick’s Day desserts gluten-free?
Absolutely! Replace all-purpose flour with a 1:1 gluten-free flour blend in most recipes. For cookies, almond flour works wonderfully. Make sure all other ingredients (like vanilla extract and baking powder) are certified gluten-free. The texture may be slightly different but still delicious.
How do I prevent green food coloring from staining my hands and kitchen surfaces?
Wear disposable gloves when handling colored dough or frosting. For surfaces, clean up spills immediately with a paste of baking soda and water. Gel coloring is less likely to stain than liquid coloring. If staining occurs on hands, scrub with lemon juice and salt, then wash with dish soap.
Final Thoughts
Creating these festive St Patrick’s Day desserts is about more than just the final product – it’s about bringing joy, color, and celebration to your table. Whether you choose to make simple shamrock cookies with the kids or attempt an elaborate green velvet layer cake, each treat carries the spirit of the season and creates lasting memories with loved ones.
Remember that baking should be fun, so don’t stress about achieving perfect results on your first try. Some of my favorite baking memories come from the slightly imperfect cookies and the joyful chaos of a kitchen covered in green flour. Embrace the festive spirit, enjoy the process, and most importantly, share these delicious creations with the people who matter most to you.
Ready to Try It?
Ready to bring some Irish luck to your kitchen? Pick your favorite recipe from this collection and start creating magic! Don’t forget to share photos of your beautiful green creations on social media – I love seeing how these recipes come to life in your kitchens. Happy St. Patrick’s Day baking, and may your treats be as sweet as your celebrations!