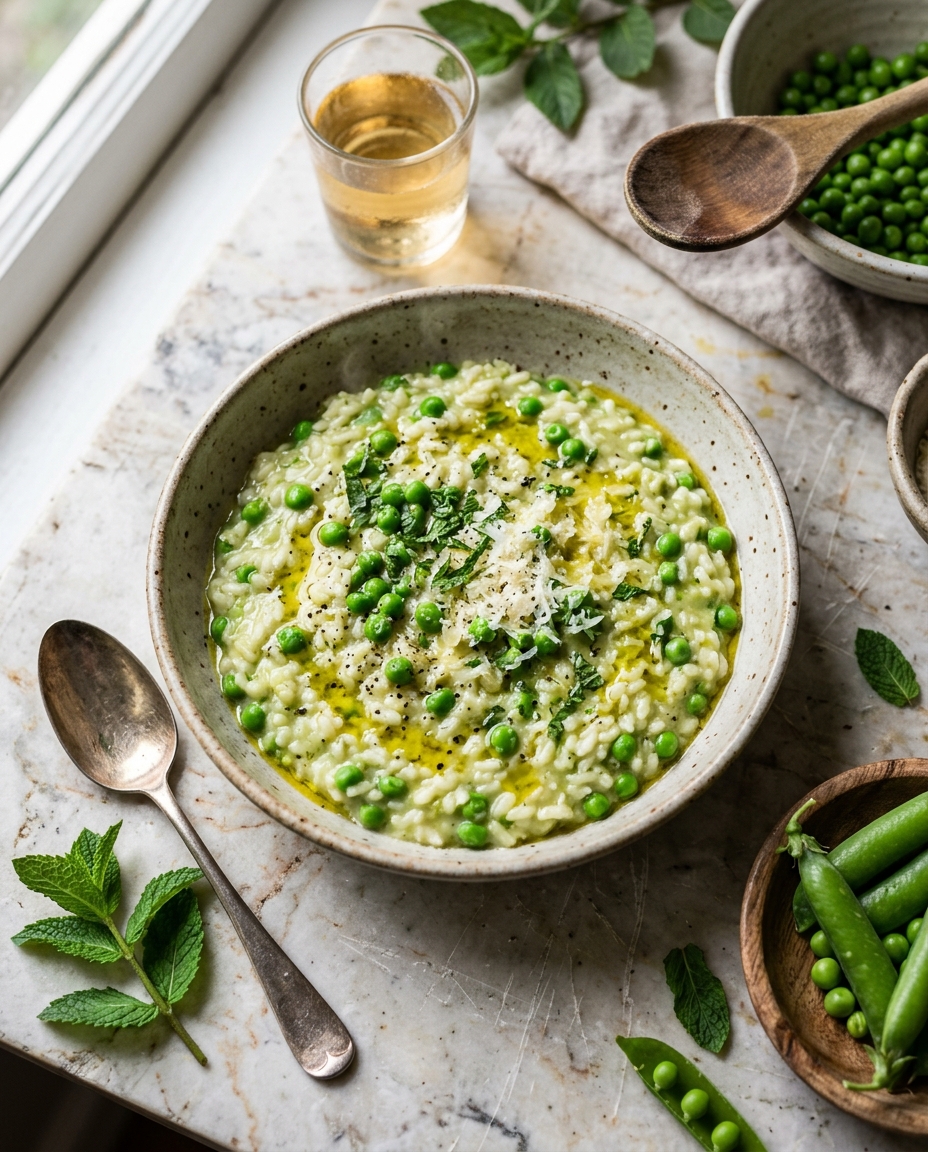
There’s something magical about spring pea risotto that instantly transports you to the Italian countryside, even if you’re cooking in your kitchen on a Tuesday night. This creamy pea risotto is one of my absolute favorite spring dinner ideas because it celebrates fresh, seasonal ingredients in the most elegant way possible. The vibrant green peas combined with creamy arborio rice and a touch of parmesan create a dish that’s both comforting and sophisticated.
What I love most about this easy risotto recipe is that it doesn’t require fancy techniques or hard-to-find ingredients. Sure, it needs some attention and stirring, but the process is incredibly meditative and rewarding. Once you master the technique, you’ll find yourself making spring pea risotto again and again, especially when you want to impress dinner guests without spending hours in the kitchen.
This spring vegetable risotto comes together in about 30 minutes, making it perfect for weeknight dinners or casual entertaining. The combination of fresh peas, aromatic vegetable broth, and quality parmesan cheese creates a homemade risotto that tastes like it came straight from a Michelin-starred restaurant.
Why You’ll Love This Spring Pea Risotto Recipe
- Seasonal and Fresh: Spring peas are at their peak flavor during spring months, making this the perfect time to enjoy fresh, vibrant ingredients in your risotto with parmesan.
- Surprisingly Easy: Despite its elegant appearance, this creamy pea risotto is an easy risotto recipe that even beginners can master with basic cooking skills and patience.
- Naturally Creamy: The starch from the arborio rice creates natural creaminess without heavy cream, making this Italian risotto recipe healthier than you’d expect.
- Quick Weeknight Dinner: Ready in 30 minutes, this spring vegetable risotto fits perfectly into busy weeknight schedules while still feeling special.
- Customizable: This homemade risotto serves as a blank canvas—easily adapt it with different vegetables, proteins, or cheeses based on what you have on hand.
- Freezer-Friendly: Unlike some risotto dishes, this spring pea risotto reheats beautifully, making meal prep simple and stress-free.
Ingredients You’ll Need
The beauty of learning how to make risotto lies in understanding your core ingredients. For this spring pea risotto, you’ll need arborio rice as your foundation—this short-grain Italian rice has the perfect starch content to create that signature creamy texture. Fresh or frozen spring peas work equally well, though fresh peas in season are a real treat. Good quality vegetable or chicken broth is essential since you’ll be cooking the rice in it, so the flavor matters tremendously.
Parmesan cheese, fresh butter, white wine, and a good onion or shallot round out your ingredient list. These simple components, when combined properly, create an elegant creamy pea risotto that rivals restaurant versions. Don’t skip the quality parmesan—it makes a noticeable difference in the final dish.
Risotto Base
- 4 cups vegetable or chicken broth (warmed in a separate pot)
- 1.5 cups arborio rice (do not rinse)
- 2 cups fresh or frozen spring peas (add frozen peas directly without thawing)
- 1 medium shallot or yellow onion (finely diced)
- 2 cloves garlic (minced)
For Creaminess and Flavor
- 3/4 cup dry white wine (such as Pinot Grigio or Sauvignon Blanc)
- 3 tablespoons unsalted butter (divided into 2 tbsp and 1 tbsp)
- 1 tablespoon extra virgin olive oil (good quality)
- 3/4 cup grated Parmigiano-Reggiano cheese (freshly grated, not pre-packaged)
- 1/2 teaspoon sea salt (plus more to taste)
- 1/4 teaspoon freshly ground black pepper (adjust to preference)
For Finishing and Serving
- 2 tablespoons fresh mint leaves (thinly sliced, optional but recommended)
- 1 tablespoon fresh lemon zest (for brightness)
- 1 pinch red pepper flakes (optional, for subtle heat)
Optional Add-ins:
- Heavy cream
- Pancetta or prosciutto
- Asparagus
- Truffle oil
How to Make Spring Pea Risotto Recipe (Step-by-Step)
1. Prepare Your Mise en Place
Pour your vegetable or chicken broth into a medium saucepan and bring it to a gentle simmer over medium heat. Keep it simmering throughout the entire cooking process—this ensures each addition of broth is warm when it hits the rice, promoting even cooking and proper starch release.
Pro tip: Cold broth will shock the rice and disrupt the cooking process, so this step is crucial for success.
Dice your shallot finely and mince your garlic. Having everything prepped before you start cooking is essential because once you begin the risotto process, you need both hands managing the rice and broth.
Pro tip: Professional risotto chefs call this mise en place, and it’s the difference between a smooth cooking experience and a hectic one.
2. Toast the Rice and Build Flavor
Heat olive oil and 2 tablespoons of butter together in your large skillet over medium heat. Once the butter is foaming, add the diced shallots and cook for 2-3 minutes, stirring frequently, until they become translucent and fragrant.
Pro tip: Don’t brown the shallots—you want them soft and sweet, not caramelized.
Add the minced garlic and cook for another 30 seconds until fragrant. Then add your arborio rice, stirring constantly for 1-2 minutes. You’ll hear a gentle clicking sound as the rice moves around the pan, which indicates proper toasting.
Pro tip: Toasting the rice without liquid is key to developing a subtle nutty flavor that distinguishes restaurant-quality risotto. This step should not be skipped.
Pour in the white wine and stir continuously until the rice absorbs all the liquid, about 1-2 minutes. You should see the liquid gradually disappear and the rice become slightly translucent around the edges.
Pro tip: The wine adds acidity and depth—don’t skip it or substitute it with vinegar, which would be too harsh.
3. Add Broth Gradually and Stir Constantly
Using a ladle, add about 1 cup of warm broth to the rice and stir constantly over medium heat. Continue stirring until the rice absorbs most of the liquid, which typically takes 2-3 minutes. You should see the mixture transition from liquidy to creamy as the rice releases its starches.
Pro tip: Constant stirring is not negotiable—it releases starch from the rice grains, creating natural creaminess. This is the meditative part of how to make risotto.
Add another ladle of warm broth (about 3/4 cup) and repeat the process. Continue this pattern, adding broth one ladle at a time and stirring constantly, for approximately 16-18 minutes total. The rice should gradually go from firm to tender with a slight firmness in the center.
Pro tip: Look for a grain of rice to bend easily when you press it between your fingers—this indicates proper doneness. This is called ‘al dente’ in risotto cooking.
Taste the rice around the 15-minute mark. The grains should be creamy and tender but still have a slight resistance when you bite them. If they’re still too firm, continue adding broth and stirring.
Pro tip: Risotto doesn’t require an exact amount of broth because it depends on how quickly your rice absorbs liquid. Always taste and adjust rather than following timing too rigidly.
4. Incorporate the Spring Peas
When your rice is nearly cooked through (about 16-17 minutes into the process), add the fresh or frozen spring peas. Stir them in and continue cooking for 2-3 more minutes until the peas are heated through. If using frozen peas, add them directly without thawing.
Pro tip: Adding peas at the end preserves their bright green color and fresh flavor better than cooking them the entire time.
The mixture should now look creamy and flowing, not dry or thick. If it seems too thick, add a bit more warm broth or a splash of pasta water to reach your desired consistency.
Pro tip: Remember that risotto will continue to thicken slightly as it cools, so it should look slightly looser on the stove than your final serving texture.
5. Finish with Butter, Cheese, and Aromatics
Remove the pan from heat. Add the remaining 1 tablespoon of cold butter and the freshly grated Parmigiano-Reggiano cheese. Stir vigorously for about 1 minute until the cheese melts completely and the risotto becomes silky and glossy.
Pro tip: This final step, called ‘mantecatura’ in Italian, is what creates that signature creamy texture. Cold butter and cheese stirred off heat create emulsion magic.
Season with sea salt and freshly ground black pepper to taste. Remember that the parmesan is already salty, so taste before adding more salt.
Pro tip: Fresh black pepper makes a noticeable difference—pre-ground pepper loses its aroma, so grind it fresh if possible.
Stir in the fresh lemon zest and about half of the mint if using. Reserve the remaining mint for garnish.
Pro tip: Lemon zest brightens the pea flavor beautifully and adds a spring-like freshness to your spring pea risotto.
6. Plate and Serve Immediately
Divide the spring pea risotto among serving bowls and garnish with remaining fresh mint, a small drizzle of extra virgin olive oil, and a few red pepper flakes if desired. Serve immediately while the risotto is hot and creamy.
Pro tip: Risotto doesn’t hold well and will continue to thicken as it sits, so have your guests ready to eat when you plate it. This is true restaurant-style service.
Spring Pea Risotto Recipe – Full Recipe
Spring Pea Risotto Recipe
Ingredients
Equipment
Method
- Pour your vegetable or chicken broth into a medium saucepan and bring it to a gentle simmer over medium heat. Keep it simmering throughout the entire cooking process—this ensures each addition of broth is warm when it hits the rice, promoting even cooking and proper starch release. Pro tip: Cold broth will shock the rice and disrupt the cooking process, so this step is crucial for success.
- Dice your shallot finely and mince your garlic. Having everything prepped before you start cooking is essential because once you begin the risotto process, you need both hands managing the rice and broth. Pro tip: Professional risotto chefs call this mise en place, and it's the difference between a smooth cooking experience and a hectic one.
- Heat olive oil and 2 tablespoons of butter together in your large skillet over medium heat. Once the butter is foaming, add the diced shallots and cook for 2-3 minutes, stirring frequently, until they become translucent and fragrant. Pro tip: Don't brown the shallots—you want them soft and sweet, not caramelized.
- Add the minced garlic and cook for another 30 seconds until fragrant. Then add your arborio rice, stirring constantly for 1-2 minutes. You'll hear a gentle clicking sound as the rice moves around the pan, which indicates proper toasting. Pro tip: Toasting the rice without liquid is key to developing a subtle nutty flavor that distinguishes restaurant-quality risotto. This step should not be skipped.
- Pour in the white wine and stir continuously until the rice absorbs all the liquid, about 1-2 minutes. You should see the liquid gradually disappear and the rice become slightly translucent around the edges. Pro tip: The wine adds acidity and depth—don't skip it or substitute it with vinegar, which would be too harsh.
- Using a ladle, add about 1 cup of warm broth to the rice and stir constantly over medium heat. Continue stirring until the rice absorbs most of the liquid, which typically takes 2-3 minutes. You should see the mixture transition from liquidy to creamy as the rice releases its starches. Pro tip: Constant stirring is not negotiable—it releases starch from the rice grains, creating natural creaminess. This is the meditative part of how to make risotto.
- Add another ladle of warm broth (about 3/4 cup) and repeat the process. Continue this pattern, adding broth one ladle at a time and stirring constantly, for approximately 16-18 minutes total. The rice should gradually go from firm to tender with a slight firmness in the center. Pro tip: Look for a grain of rice to bend easily when you press it between your fingers—this indicates proper doneness. This is called 'al dente' in risotto cooking.
- Taste the rice around the 15-minute mark. The grains should be creamy and tender but still have a slight resistance when you bite them. If they're still too firm, continue adding broth and stirring. Pro tip: Risotto doesn't require an exact amount of broth because it depends on how quickly your rice absorbs liquid. Always taste and adjust rather than following timing too rigidly.
- When your rice is nearly cooked through (about 16-17 minutes into the process), add the fresh or frozen spring peas. Stir them in and continue cooking for 2-3 more minutes until the peas are heated through. If using frozen peas, add them directly without thawing. Pro tip: Adding peas at the end preserves their bright green color and fresh flavor better than cooking them the entire time.
- The mixture should now look creamy and flowing, not dry or thick. If it seems too thick, add a bit more warm broth or a splash of pasta water to reach your desired consistency. Pro tip: Remember that risotto will continue to thicken slightly as it cools, so it should look slightly looser on the stove than your final serving texture.
- Remove the pan from heat. Add the remaining 1 tablespoon of cold butter and the freshly grated Parmigiano-Reggiano cheese. Stir vigorously for about 1 minute until the cheese melts completely and the risotto becomes silky and glossy. Pro tip: This final step, called 'mantecatura' in Italian, is what creates that signature creamy texture. Cold butter and cheese stirred off heat create emulsion magic.
- Season with sea salt and freshly ground black pepper to taste. Remember that the parmesan is already salty, so taste before adding more salt. Pro tip: Fresh black pepper makes a noticeable difference—pre-ground pepper loses its aroma, so grind it fresh if possible.
- Stir in the fresh lemon zest and about half of the mint if using. Reserve the remaining mint for garnish. Pro tip: Lemon zest brightens the pea flavor beautifully and adds a spring-like freshness to your spring pea risotto.
- Divide the spring pea risotto among serving bowls and garnish with remaining fresh mint, a small drizzle of extra virgin olive oil, and a few red pepper flakes if desired. Serve immediately while the risotto is hot and creamy. Pro tip: Risotto doesn't hold well and will continue to thicken as it sits, so have your guests ready to eat when you plate it. This is true restaurant-style service.
Notes
- Keep your broth warm and simmering throughout cooking—cold broth disrupts the risotto process
- Stir constantly for 16-18 minutes to release rice starch and create natural creaminess
- Taste rice around the 15-minute mark; it should be tender but still slightly firm in the center (al dente)
Tips for the Best Spring Pea Risotto Recipe
- Keep Your Broth Hot: This cannot be overstated. Cold broth added to hot rice disrupts the cooking process and prevents proper starch release. Use a dedicated saucepan to keep your broth at a gentle simmer throughout.
- Invest in Quality Arborio Rice: Not all arborio rice is created equal. Look for Italian arborio from regions like Piedmont. Cheaper versions won’t release starch properly, and your risotto will be gluey or watery.
- Stir Constantly, But Not Obsessively: You need constant stirring to release starches, but you don’t need to attack the pan. Use smooth, continuous motions with a wooden spoon.
- Fresh Peas Make a Difference: If you have access to fresh spring peas, use them. The difference is noticeable compared to frozen. However, frozen peas are perfectly acceptable and sometimes fresher than grocery store ‘fresh’ peas.
- Taste as You Go: Start tasting rice grains around the 15-minute mark. Everyone’s stove is different, so timing is just a guide. You’re looking for tender rice with a slight firmness in the center.
- Don’t Overcrowd the Pan: Using a skillet that’s too small creates steam rather than proper evaporation, affecting texture. A 12-inch skillet is ideal for this recipe.
Variations to Try
- Spring Vegetable Medley Risotto: Add diced asparagus, fresh herbs like tarragon, and snap peas along with the spring peas for a more complex spring vegetable risotto that celebrates the season.
- Risotto with Pancetta and Peas: Cook 3 ounces of diced pancetta until crispy, set aside, then use the rendered fat as part of your cooking fat. Stir pancetta back in at the end for a heartier easy risotto recipe.
- Creamy Pea Risotto with Truffle Oil: After plating your spring pea risotto, drizzle with a tiny amount of quality truffle oil and finish with fresh truffle shavings for a luxurious version.
- Lemon and Mint Risotto: Increase the lemon zest to 1.5 tablespoons and double the fresh mint for a brighter, herbaceous version perfect for serving alongside grilled fish.
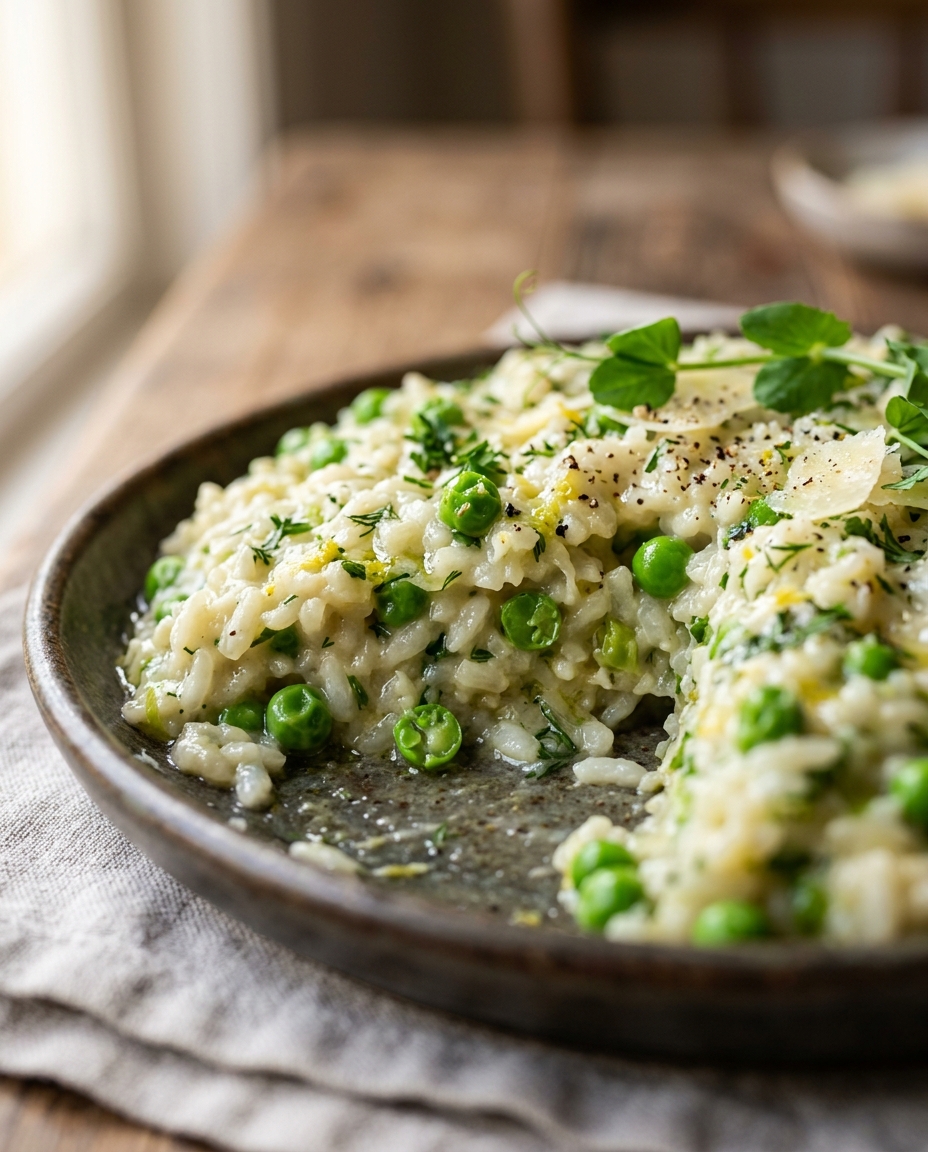
- Creamy Pea Risotto with Feta and Dill: Replace half the parmesan with crumbled feta cheese and add fresh dill instead of mint for a Mediterranean twist on traditional Italian risotto recipe.
Storage and Meal Prep Tips
- Refrigerator Storage: Leftover spring pea risotto will keep in an airtight container for up to 3 days. The risotto will thicken significantly as it cools.
- Freezer Storage: This recipe freezes well for up to 2 months. Cool completely, portion into airtight containers or freezer bags, and label with the date. Thaw overnight in the refrigerator before reheating.
- Reheating Method: Transfer to a saucepan over low heat and add a splash of warm broth or water, stirring gently until the creamy pea risotto returns to its original consistency. This usually takes 5-7 minutes. Avoid high heat, which can break the emulsion.
- Microwave Reheating: If short on time, place risotto in a microwave-safe bowl, add 1-2 tablespoons of broth, cover loosely, and heat for 1-2 minutes, stirring halfway through. The stovetop method produces better texture but microwave works in a pinch.
- Make-Ahead Tip: You can prepare the initial steps (toasting rice, adding wine) up to 2 hours ahead and keep it on the stove over very low heat. Add the remaining broth and peas when you’re ready to serve for a more manageable dinner party.
Nutritional Benefits
Spring pea risotto isn’t just delicious—it’s also surprisingly nutritious. Fresh spring peas provide plant-based protein, fiber, and essential vitamins including vitamin C, which supports immune function and collagen production. The arborio rice provides complex carbohydrates for sustained energy, while the parmesan cheese contributes calcium for bone health. This homemade risotto is naturally lower in calories than you might expect from such a creamy dish, thanks to the natural starch-based creaminess rather than heavy cream. The combination of vegetables and whole grains makes this spring vegetable risotto a well-balanced meal, especially when paired with a simple side salad.
- Fresh peas provide plant-based protein and fiber for digestive health
- Vitamin C content supports immune function and antioxidant protection
- Parmesan cheese delivers calcium and vitamin B12 for bone and nerve health
- Arborio rice offers complex carbohydrates for sustained energy
- Natural starch-based creaminess means fewer added calories than cream-based alternatives
What to Serve With Spring Pea Risotto Recipe
- Simple Arugula Salad: Toss peppery arugula with lemon vinaigrette and shaved parmesan. The acidity cuts through the richness of the spring pea risotto beautifully.
- Grilled Asparagus with Garlic: Brush fresh asparagus with olive oil, season with salt and garlic, and grill or roast until tender. The vegetal flavor complements creamy pea risotto perfectly.
- Garlic Bread or Crostini: Toasted bread rubbed with garlic and brushed with olive oil provides textural contrast and helps soak up every bit of the creamy sauce.
- Roasted Lemon Chicken Breast: A simple pan-seared chicken breast with lemon and herbs turns this spring vegetable risotto into a complete protein-balanced meal.
- Light White Wine Pairing: A crisp Pinot Grigio or Vermentino complements the delicate pea flavors. The acidity refreshes your palate between bites of the rich, creamy risotto.
Frequently Asked Questions
Can I make spring pea risotto ahead of time?
Risotto is best served immediately after cooking when it’s creamy and flowing. However, you can prepare the mise en place (chopped ingredients) several hours ahead and toast the rice up to 2 hours before serving, keeping it on very low heat. If you have leftovers, store them in the refrigerator for up to 3 days and reheat gently with added broth to restore creaminess. For freezing, this recipe keeps well for up to 2 months when properly stored in airtight containers.
What is the best type of rice for homemade risotto?
Arborio rice is the gold standard for risotto because of its high starch content and ability to absorb liquid while maintaining its shape. Carnaroli rice is an excellent alternative with slightly larger grains. Avoid long-grain white rice or jasmine rice, which will result in a mushy or gluey texture. Look for Italian arborio rice from regions like Piedmont for the best quality and authentic results in your homemade risotto.
How do I know when risotto is done cooking?
Properly cooked risotto rice should be tender but still have a slight firmness in the center—this is called ‘al dente.’ Around the 15-minute mark, start tasting individual grains by pressing them between your teeth. They should bend and be creamy but not mushy. The overall mixture should look creamy and flow slightly when you shake the pan, not sit in a stiff mound. If rice is still too firm, continue adding warm broth in ¾-cup increments and stirring.
Can I use frozen peas instead of fresh for this spring pea risotto?
Absolutely! Frozen peas work perfectly in this recipe and are often just as good as grocery store ‘fresh’ peas, which may have been sitting around for days. Simply add frozen peas directly to the risotto without thawing during the final 2-3 minutes of cooking. They’ll heat through quickly and maintain their bright green color. If anything, frozen peas are more convenient and sometimes fresher-tasting than fresh peas purchased out of season.
What’s the difference between creamy pea risotto and pasta risotto, and why does risotto need constant stirring?
Risotto requires constant stirring because this motion releases starch from the arborio rice grains into the cooking liquid, creating natural creaminess without cream. This starch release process is essential and cannot be rushed. Unlike pasta, which you cook in excess water and then drain, risotto uses a specific ratio of liquid to rice. The constant interaction between rice and liquid creates an emulsion that produces the signature creamy texture. Stop stirring and you’ll end up with either gluey rice or separate liquid—neither is desirable in a proper creamy pea risotto.
Final Thoughts
Spring pea risotto has become my go-to recipe whenever I want to create something special without spending hours in the kitchen. There’s an elegance to this dish that belies its simplicity—it’s a reminder that sometimes the most impressive meals come from respecting quality ingredients and proper technique rather than complicated recipes. Whether you’re cooking for yourself on a quiet Tuesday evening or hosting a dinner party, this spring vegetable risotto never fails to impress.
The wonderful thing about mastering this easy risotto recipe is that once you understand the technique, you can apply it to so many variations. Add different vegetables, proteins, or cheeses depending on what’s in your pantry and what you’re craving. But always come back to this spring pea risotto when those fresh peas appear at the farmers market—it’s the perfect celebration of the season.
Ready to Try It?
I’d love to hear how your spring pea risotto turns out! Drop a comment below with any variations you try or questions you have about the cooking process. If you make this recipe, share a photo on Instagram and tag AppetizingIdeas—I absolutely love seeing what you create in your kitchen. Don’t forget to save this recipe to your favorites and subscribe to the blog for more seasonal, elegant recipes that prove restaurant-quality cooking is absolutely achievable at home.