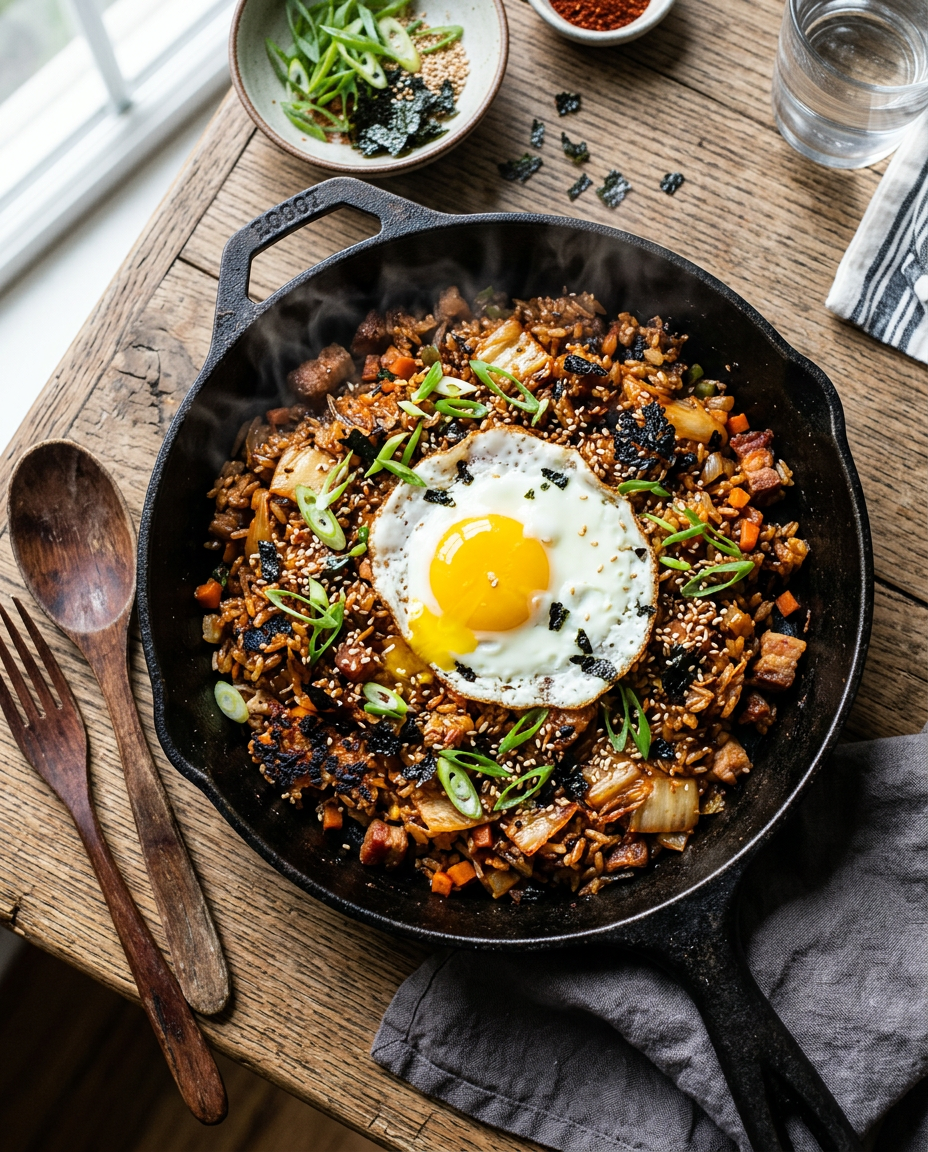
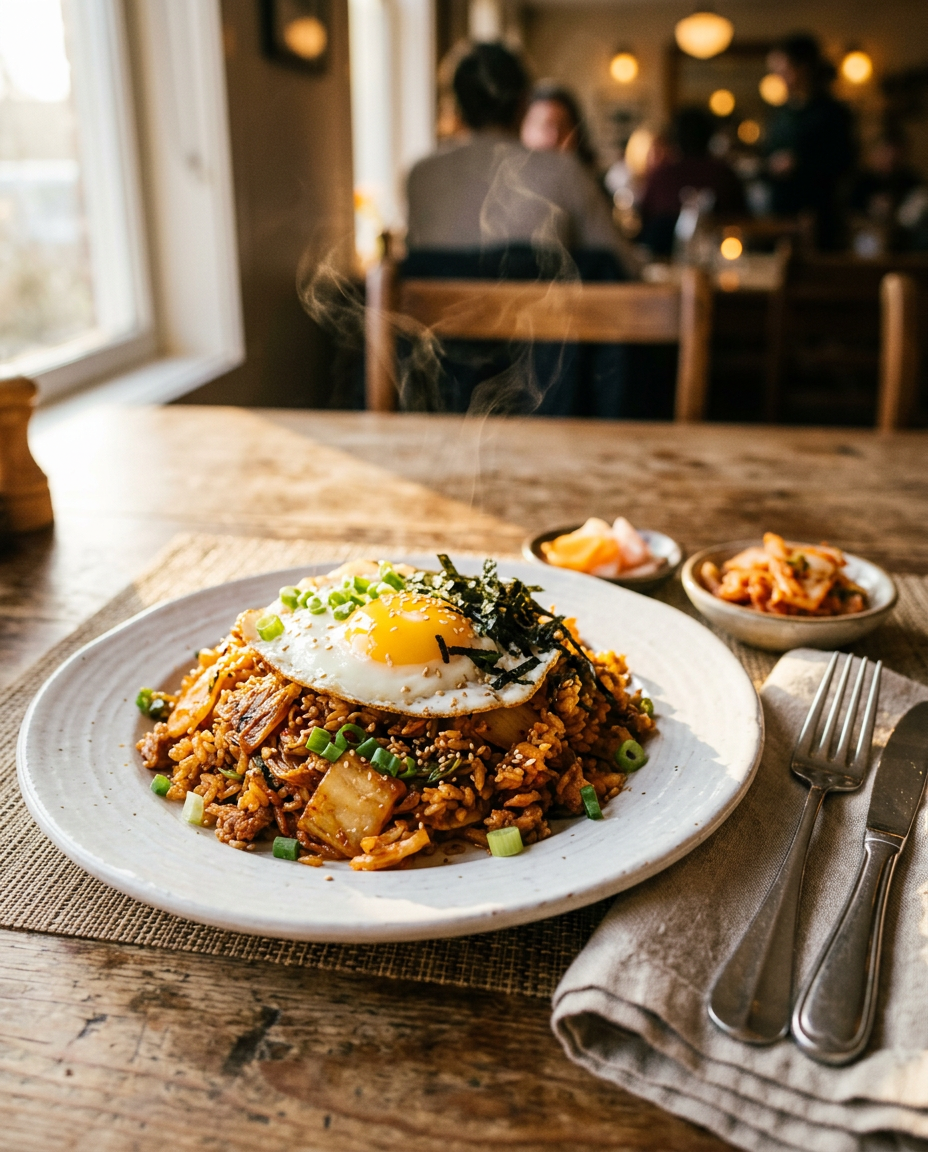
There’s nothing quite like the soul-warming comfort of authentic kimchi fried rice sizzling in a hot pan. This beloved Korean dish transforms humble leftover rice and tangy fermented kimchi into something absolutely magical – a perfect harmony of spicy, savory, and umami flavors that’ll have you craving more with every single bite.
What I love most about this recipe is how it embodies the Korean philosophy of making something extraordinary from simple ingredients. The fermented kimchi adds incredible depth and complexity, while the high heat creates those coveted crispy rice bits that make each forkful irresistibly satisfying.
Whether you’re looking for a quick weeknight dinner or wanting to explore authentic Korean comfort food, this kimchi fried rice delivers bold flavors and satisfying textures that’ll transport your taste buds straight to Seoul.
Why You’ll Love This Spicy Korean Kimchi Fried Rice Recipe
- Incredibly Quick: Ready in just 15 minutes using leftover rice and pantry staples
- Flavor Explosion: The fermented kimchi creates layers of tangy, spicy, and umami goodness
- Perfect for Leftovers: Transforms day-old rice into something even better than the original meal
- Customizable Heat Level: Adjust the spiciness to your preference with gochujang and kimchi amounts
- One-Pan Wonder: Minimal cleanup required for maximum flavor payoff
- Authentic Korean Experience: Experience genuine Korean comfort food flavors at home
Ingredients You’ll Need
The secret to outstanding kimchi fried rice lies in using well-fermented kimchi that’s been aging for at least a week. The more sour and funky your kimchi, the better your fried rice will taste. Day-old rice is absolutely crucial here – freshly cooked rice will turn mushy and won’t achieve those perfect crispy bits we’re after.
Gochujang adds that signature Korean heat and sweetness, while sesame oil provides the final aromatic touch that makes this dish truly authentic. Don’t skip the kimchi juice – it’s liquid gold that intensifies every flavor in the pan.
For the Rice
- 3 cups cooked short-grain rice (preferably day-old and refrigerated)
- 1 cup well-fermented kimchi (chopped into bite-sized pieces)
- 1/4 cup kimchi juice (reserved from the kimchi jar)
- 2 tablespoons vegetable oil (or neutral cooking oil)
For the Flavor Base
- 2 tablespoons gochujang (Korean chili paste)
- 1 tablespoon soy sauce (low sodium preferred)
- 1 tablespoon sesame oil (toasted)
- 1 teaspoon sugar (or honey)
- 3 cloves garlic (minced)
For Serving
- 2 large eggs (for topping)
- 2 green onions scallions (sliced diagonally)
- 1 tablespoon sesame seeds (toasted)
- 1 sheet roasted seaweed (torn into pieces)
Optional Add-ins:
- bacon or spam
- mushrooms
- frozen peas
- fresh chili peppers
How to Make Spicy Korean Kimchi Fried Rice Recipe (Step-by-Step)
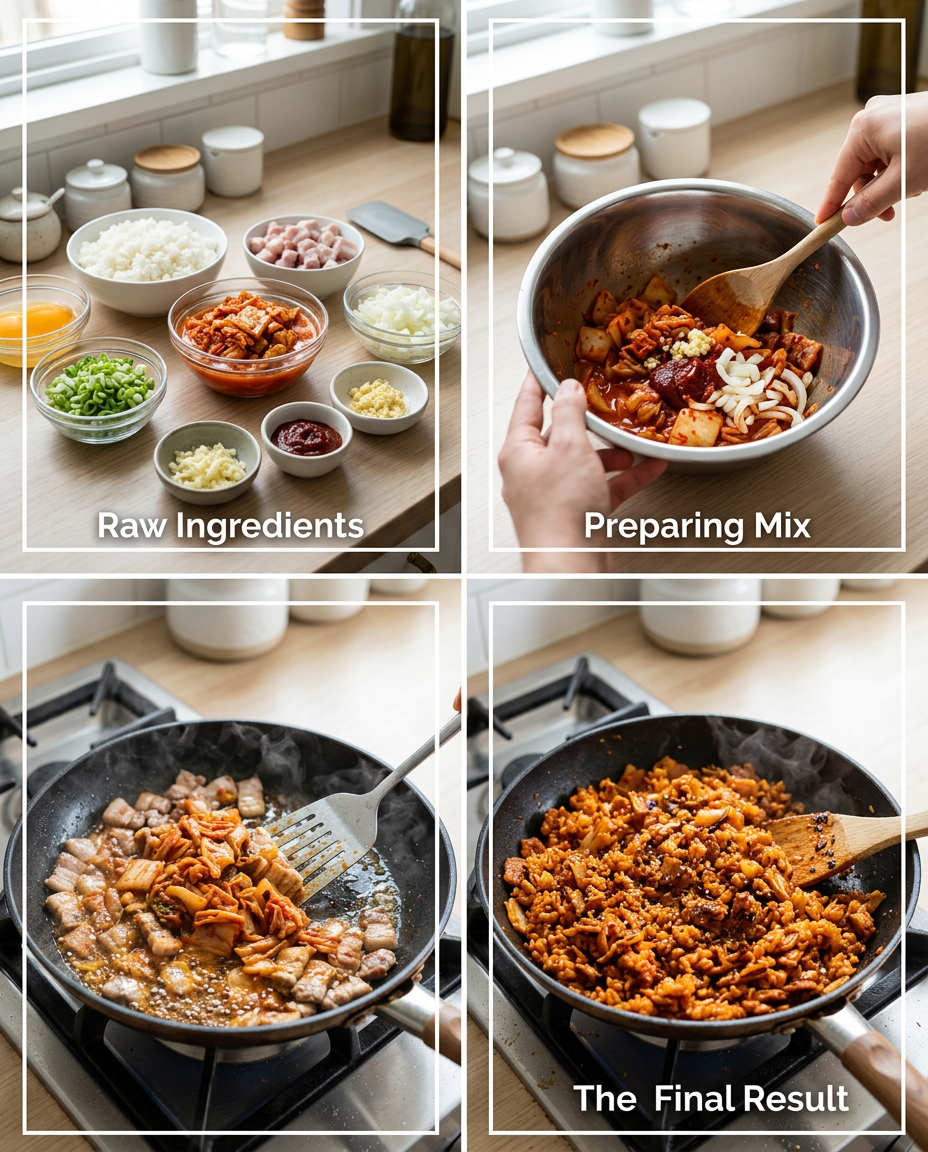
1. Prepare the Sauce and Ingredients
In a small bowl, whisk together gochujang, soy sauce, sesame oil, and sugar until smooth. Set aside.
Pro tip: Mix the sauce thoroughly to avoid lumps of gochujang in your rice.
Chop the kimchi into bite-sized pieces and reserve 1/4 cup of the kimchi juice. Mince the garlic and slice the green onions.
Pro tip: Don’t discard that precious kimchi juice – it’s packed with fermented flavor!
2. Heat the Pan and Sauté Aromatics
Heat vegetable oil in a large wok or skillet over medium-high heat until shimmering.
Pro tip: The pan should be hot enough that a grain of rice sizzles immediately when added.
Add minced garlic and stir-fry for 30 seconds until fragrant. Add chopped kimchi and cook for 2-3 minutes, stirring frequently.
Pro tip: Cooking the kimchi first develops deeper flavors and reduces excess moisture.
3. Add Rice and Seasonings
Add the cold, day-old rice to the pan, breaking up any clumps with your spoon or spatula.
Pro tip: Cold rice separates easier and won’t turn mushy during stir-frying.
Pour the prepared sauce and kimchi juice over the rice. Stir-fry for 3-4 minutes, allowing some rice to get crispy on the bottom.
Pro tip: Don’t stir constantly – let the rice sit for 30-second intervals to develop those coveted crispy bits.
4. Cook the Eggs
In a separate small pan, fry the eggs sunny-side up with crispy edges, keeping the yolks runny.
Pro tip: The runny yolk acts as an additional creamy sauce when mixed into the rice.
5. Final Assembly and Serving
Transfer the kimchi fried rice to serving bowls. Top each portion with a fried egg.
Pro tip: Serve immediately while the rice is still sizzling hot for the best texture.
Garnish with sliced green onions, toasted sesame seeds, and torn pieces of roasted seaweed.
Pro tip: Add garnishes just before serving to maintain their fresh flavors and textures.
Spicy Korean Kimchi Fried Rice Recipe – Full Recipe
Spicy Korean Kimchi Fried Rice Recipe
Ingredients
Equipment
Method
- In a small bowl, whisk together gochujang, soy sauce, sesame oil, and sugar until smooth. Set aside. Pro tip: Mix the sauce thoroughly to avoid lumps of gochujang in your rice.
- Chop the kimchi into bite-sized pieces and reserve 1/4 cup of the kimchi juice. Mince the garlic and slice the green onions. Pro tip: Don't discard that precious kimchi juice – it's packed with fermented flavor!
- Heat vegetable oil in a large wok or skillet over medium-high heat until shimmering. Pro tip: The pan should be hot enough that a grain of rice sizzles immediately when added.
- Add minced garlic and stir-fry for 30 seconds until fragrant. Add chopped kimchi and cook for 2-3 minutes, stirring frequently. Pro tip: Cooking the kimchi first develops deeper flavors and reduces excess moisture.
- Add the cold, day-old rice to the pan, breaking up any clumps with your spoon or spatula. Pro tip: Cold rice separates easier and won't turn mushy during stir-frying.
- Pour the prepared sauce and kimchi juice over the rice. Stir-fry for 3-4 minutes, allowing some rice to get crispy on the bottom. Pro tip: Don't stir constantly – let the rice sit for 30-second intervals to develop those coveted crispy bits.
- In a separate small pan, fry the eggs sunny-side up with crispy edges, keeping the yolks runny. Pro tip: The runny yolk acts as an additional creamy sauce when mixed into the rice.
- Transfer the kimchi fried rice to serving bowls. Top each portion with a fried egg. Pro tip: Serve immediately while the rice is still sizzling hot for the best texture.
- Garnish with sliced green onions, toasted sesame seeds, and torn pieces of roasted seaweed. Pro tip: Add garnishes just before serving to maintain their fresh flavors and textures.
Notes
- Day-old refrigerated rice is essential for the best texture - fresh rice will turn mushy
- Well-fermented kimchi (aged at least 1 week) provides the best sour, tangy flavor
- Adjust gochujang amount to your preferred spice level - start with less and add more as needed
Tips for the Best Spicy Korean Kimchi Fried Rice Recipe
- Use Day-Old Rice: Freshly cooked rice contains too much moisture and will result in mushy fried rice. Day-old refrigerated rice has the perfect texture.
- High Heat is Key: Keep your pan hot throughout cooking to achieve those delicious crispy rice bits and proper wok hei flavor.
- Don’t Oversauce: Start with less gochujang and add more to taste – you can always add more heat, but you can’t take it away.
- Save the Kimchi Juice: That fermented liquid is pure flavor concentrate – use every drop for maximum taste impact.
- Let It Crisp: Resist the urge to constantly stir. Let the rice sit and develop crispy bottom layers for amazing texture contrast.
- Taste and Adjust: Every kimchi brand has different saltiness and spice levels, so always taste and adjust seasonings accordingly.
Variations to Try
- Protein-Packed Version: Add diced spam, bacon, or leftover bulgogi for a heartier meal
- Seafood Kimchi Bokkeumbap: Stir in cooked shrimp or crab meat during the last minute of cooking
- Vegetarian Delight: Include mushrooms, zucchini, or bean sprouts for extra vegetables and umami
- Extra Spicy Heat: Add fresh sliced jalapeños or extra gochujang for serious heat lovers
- Cheese Kimchi Fried Rice: Sprinkle mozzarella or cheddar cheese over hot rice for a Korean-fusion twist
Storage and Meal Prep Tips
- Refrigerator Storage: Store leftovers in airtight containers for up to 3 days in the refrigerator
- Freezer Storage: Can be frozen for up to 2 months, though texture may be slightly softer after thawing
- Reheating Instructions: Reheat in a hot skillet with a splash of oil to restore crispiness, or microwave with a damp paper towel
- Meal Prep Tips: Cook the rice portion ahead but add fresh fried eggs when serving for best results
Nutritional Benefits
This kimchi fried rice isn’t just delicious – it’s also packed with beneficial probiotics from the fermented kimchi that support digestive health and boost your immune system.
- Rich in probiotics from fermented kimchi for gut health
- Good source of protein from eggs
- Contains vitamin C and K from kimchi
- Provides complex carbohydrates for sustained energy
- Low in saturated fat when prepared as directed
- Includes beneficial antioxidants from garlic and sesame
What to Serve With Spicy Korean Kimchi Fried Rice Recipe
- Korean pickled radish (danmuji) for refreshing crunch
- Simple cucumber salad dressed with rice vinegar
- Korean seaweed soup (miyeokguk) for a traditional pairing
- Grilled Korean BBQ short ribs (galbi) for a feast
- Fresh lettuce wraps with ssamjang dipping sauce
Frequently Asked Questions
Can I use fresh rice instead of day-old rice for kimchi fried rice?
While day-old rice is strongly preferred for the best texture, you can use fresh rice if needed. Spread hot cooked rice on a baking sheet and let it cool for 15-20 minutes, then refrigerate for at least 30 minutes to remove excess moisture before using.
What can I substitute for gochujang in kimchi fried rice?
If you don’t have gochujang, you can substitute with a mixture of 1 tablespoon sriracha, 1 teaspoon soy sauce, and 1/2 teaspoon sugar. However, gochujang provides a unique fermented flavor that’s hard to replicate completely.
How spicy is kimchi fried rice and can I make it less spicy?
The spice level depends on your kimchi and gochujang amounts. To reduce heat, rinse the kimchi briefly before chopping, use less gochujang, and add a bit more sugar to balance the flavors. You can always start mild and add more heat gradually.
Can I make kimchi fried rice without eggs?
Absolutely! While eggs are traditional and add richness, you can skip them or substitute with extra vegetables like mushrooms or bean sprouts. The dish will still be delicious and authentic without the egg topping.
How do I know if my kimchi is fermented enough for fried rice?
Well-fermented kimchi should taste sour and tangy, not just spicy. It should have been aging for at least a week and the vegetables should be slightly softer. The kimchi juice should be cloudy and have a strong, pungent aroma – this indicates proper fermentation.
Final Thoughts
This authentic kimchi fried rice recipe brings the vibrant flavors of Korean comfort food right to your kitchen. The beautiful thing about this dish is how it transforms simple, everyday ingredients into something truly extraordinary through the magic of fermentation and high-heat cooking.
Don’t be afraid to make this recipe your own by adjusting the spice level or adding your favorite proteins and vegetables. The key is using well-fermented kimchi and day-old rice, then letting that hot pan work its magic to create those irresistible crispy bits that make every bite memorable.
Ready to Try It?
Ready to experience the incredible flavors of authentic Korean comfort food? Grab some well-fermented kimchi and leftover rice, then fire up your wok for this soul-warming kimchi fried rice that’ll have your kitchen smelling absolutely amazing and your taste buds dancing with joy!