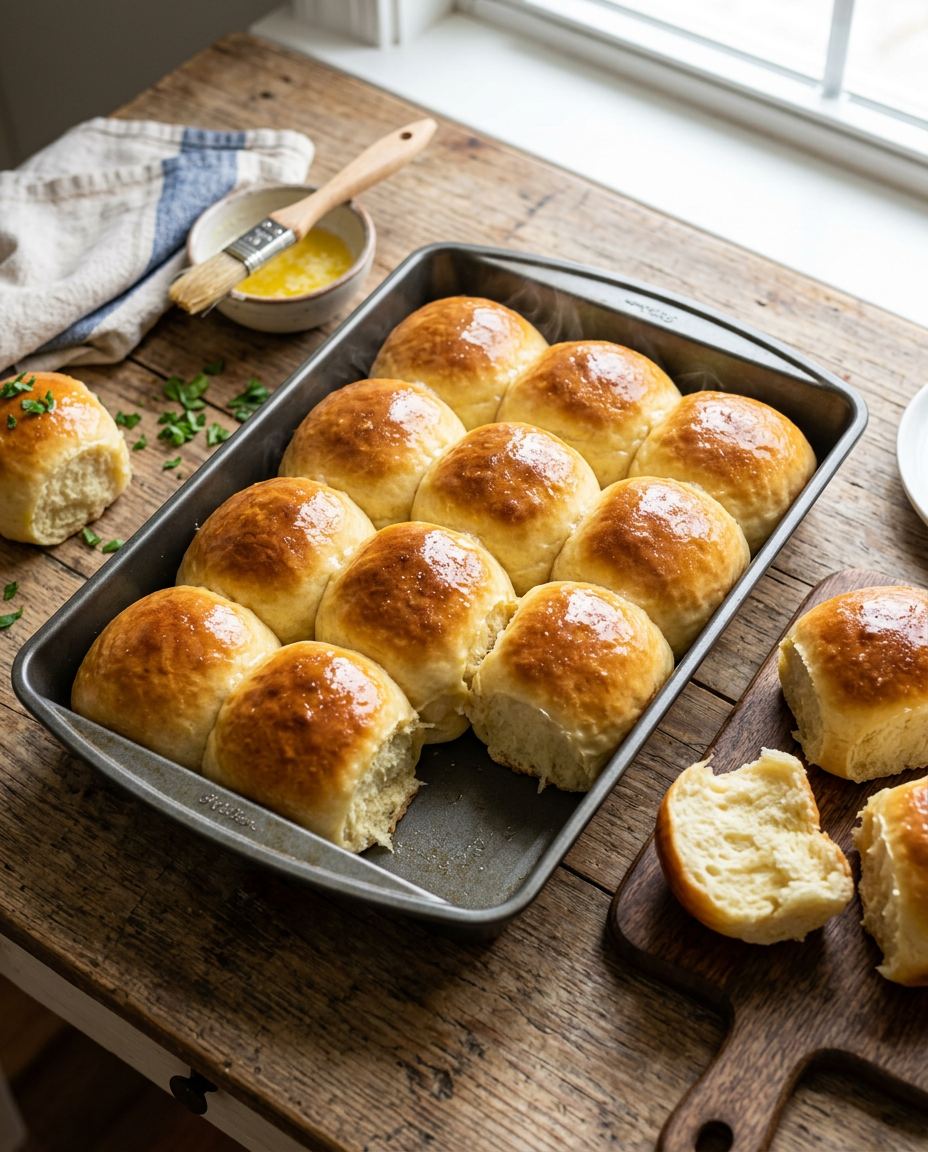
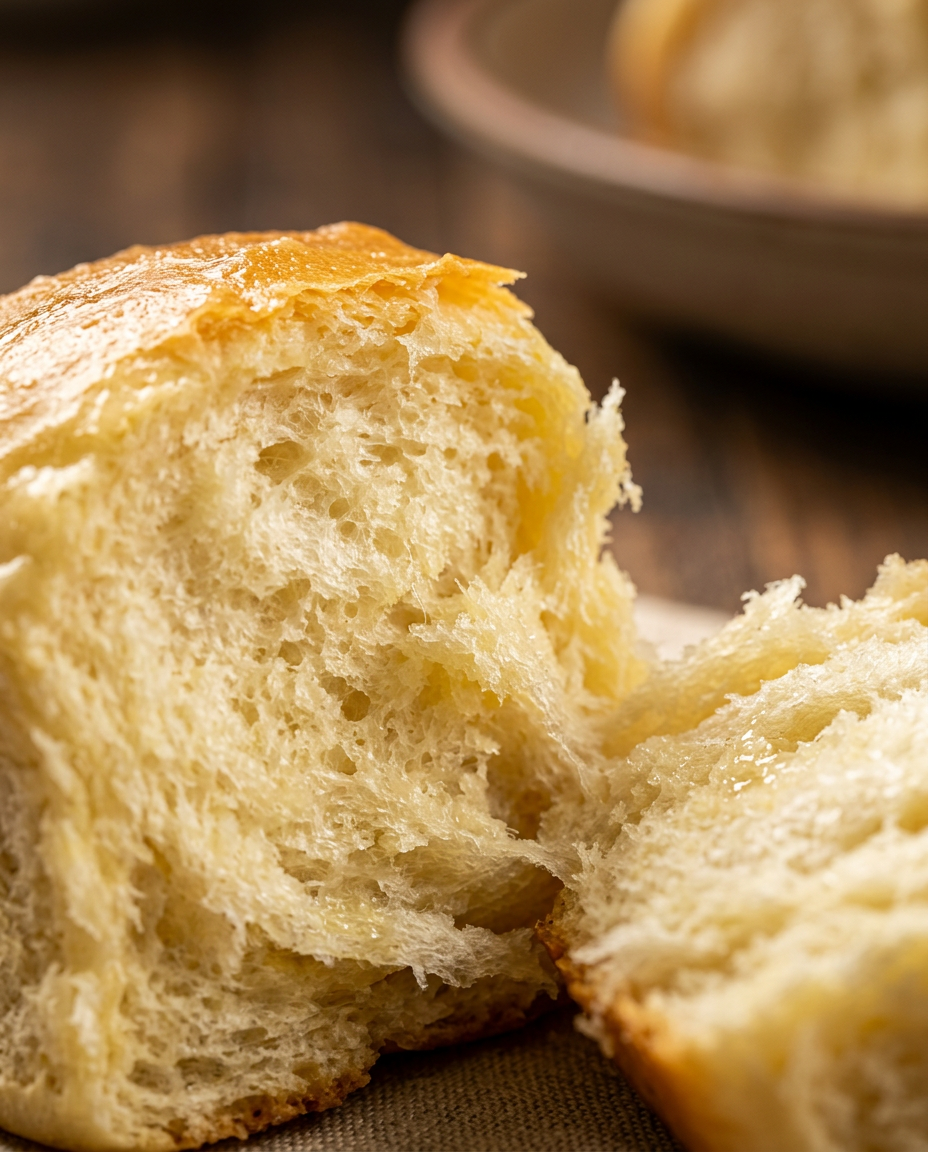
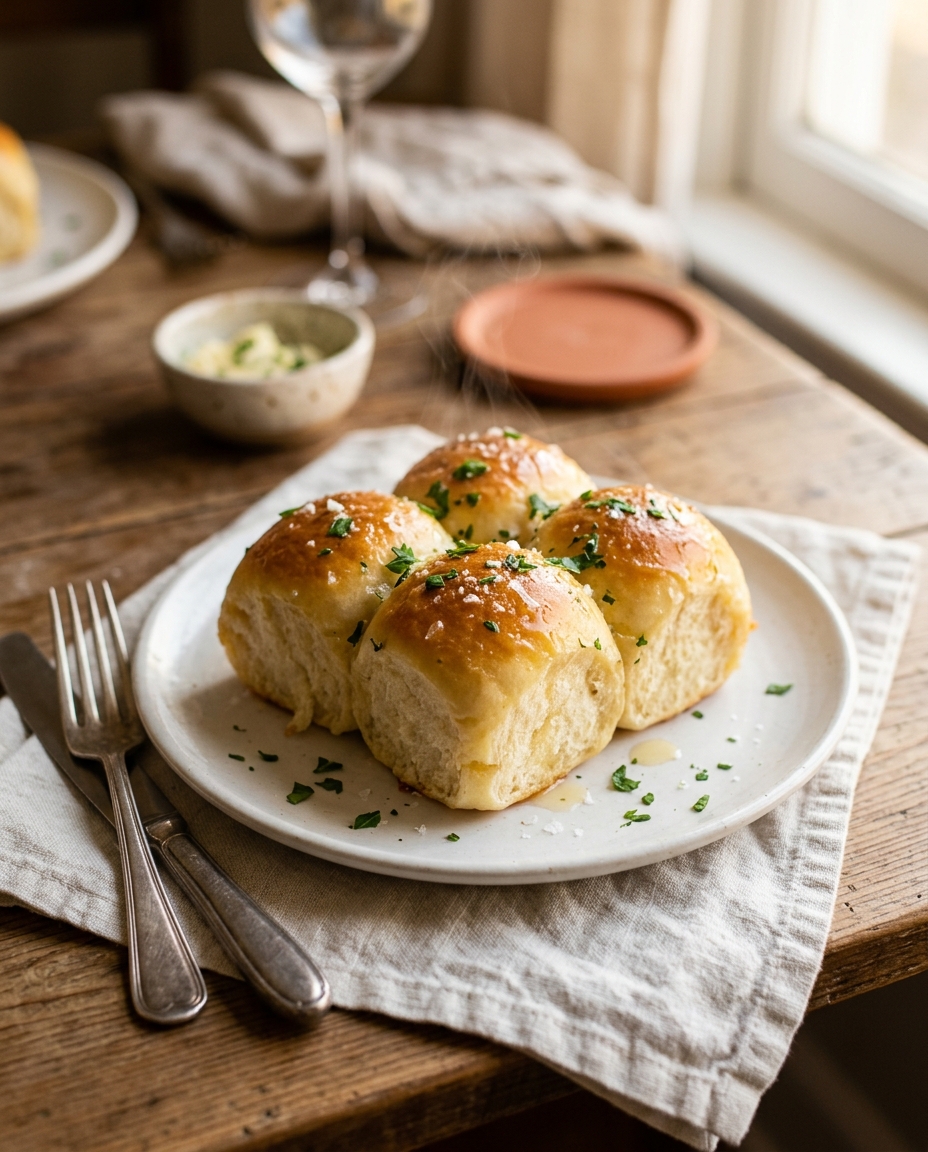
This homemade hawaiian rolls recipe creates the most incredibly soft, sweet dinner rolls that taste even better than the famous King’s Hawaiian version. With their golden, pillowy texture and subtle tropical sweetness, these fluffy dinner rolls are about to become your family’s new obsession.
There’s something truly magical about pulling apart a warm, freshly baked hawaiian roll – that perfect balance of sweetness and buttery richness that makes every bite feel like a little taste of paradise. Whether you’re planning a holiday feast or simply want to elevate your weeknight dinner, these homemade bread rolls deliver restaurant-quality results right from your own kitchen.
I’ve been perfecting this sweet bread recipe for years, and I’m excited to share all my secrets for achieving that signature tender crumb and beautiful golden crust that makes these rolls absolutely irresistible.
Why You’ll Love This Easy Hawaiian Rolls Recipe
- Incredibly Soft Texture: These yeast rolls recipe creates the most tender, pillowy rolls that practically melt in your mouth
- Perfect Sweetness: Just the right amount of sugar and pineapple juice gives these sweet dinner rolls their signature tropical flavor
- Make-Ahead Friendly: The sweet bread dough can be prepared in advance, making them perfect for holiday dinner rolls
- Foolproof Method: Clear step-by-step instructions ensure success even for beginner bread bakers
- Budget-Friendly: Much more economical than buying store-bought versions, and they taste infinitely better
- Versatile: Perfect for dinner, sandwich rolls, or even turned into french toast the next morning
Ingredients You’ll Need
The secret to authentic-tasting Hawaiian rolls lies in using the right combination of ingredients. Pineapple juice adds that subtle tropical sweetness while keeping the rolls incredibly moist. Bread flour provides the perfect structure for fluffy dinner rolls, while butter and eggs create that rich, tender crumb we all love.
I always use active dry yeast because it’s reliable and easy to work with. The combination of sugar and warm pineapple juice creates the perfect environment for the yeast to bloom, ensuring your soft bread recipe turns out perfectly every time.
For the Rolls
- 3 1/2 cups bread flour (plus extra for dusting)
- 2 1/4 teaspoons active dry yeast (1 packet)
- 1/3 cup granulated sugar
- 1 teaspoon salt
- 3/4 cup pineapple juice (warmed to 110°F)
- 1/4 cup unsalted butter (melted and cooled slightly)
- 2 large eggs (room temperature)
- 2 tablespoons unsalted butter (melted, for brushing)
Optional Add-ins:
- honey
- vanilla extract
- coconut extract
How to Make Easy Hawaiian Rolls Recipe (Step-by-Step)
1. Activate the Yeast
Warm the pineapple juice to 110°F (43°C). In a small bowl, combine the warm pineapple juice with 1 tablespoon of the sugar and sprinkle the yeast on top. Stir gently and let sit for 5-10 minutes until foamy and bubbly.
Pro tip: If your yeast doesn’t foam, it may be expired – start over with fresh yeast for best results.
2. Make the Dough
In a large mixing bowl, whisk together 3 cups of bread flour, remaining sugar, and salt. Create a well in the center and add the foamy yeast mixture, melted butter, and eggs.
Mix until a shaggy dough forms, then turn out onto a lightly floured surface. Knead for 8-10 minutes, adding the remaining flour as needed, until the dough is smooth, elastic, and slightly tacky but not sticky.
Pro tip: The dough should pass the windowpane test – you should be able to stretch a small piece thin enough to see light through it.
3. First Rise
Place the dough in a greased bowl, cover with a damp towel, and let rise in a warm, draft-free place for 1-1.5 hours, or until doubled in size.
Pro tip: Create a warm environment by placing the bowl on top of your refrigerator or in an oven with just the light on.
4. Shape the Rolls
Punch down the risen dough and turn it out onto a lightly floured surface. Divide into 12 equal pieces (about 3 oz each if using a scale).
Pro tip: For perfectly uniform rolls, weigh each piece – this ensures even baking and professional-looking results.
Shape each piece into a smooth ball by rolling it under your cupped palm. Place the shaped rolls in your greased 9×13 inch pan, spacing them evenly with about 1/2 inch between each roll.
5. Second Rise and Bake
Cover the shaped rolls with a damp towel and let rise for 45 minutes to 1 hour, until puffy and nearly doubled in size. Meanwhile, preheat your oven to 350°F (175°C).
Brush the tops of the rolls with melted butter and bake for 18-22 minutes, until golden brown on top and the internal temperature reaches 190°F (88°C).
Pro tip: Don’t overbake – these rolls continue cooking from residual heat even after removing from the oven.
Remove from oven and immediately brush with additional melted butter. Let cool in the pan for 5 minutes before serving warm.
Easy Hawaiian Rolls Recipe – Full Recipe
Easy Hawaiian Rolls Recipe
Ingredients
Equipment
Method
- Warm the pineapple juice to 110°F (43°C). In a small bowl, combine the warm pineapple juice with 1 tablespoon of the sugar and sprinkle the yeast on top. Stir gently and let sit for 5-10 minutes until foamy and bubbly. Pro tip: If your yeast doesn't foam, it may be expired - start over with fresh yeast for best results.
- In a large mixing bowl, whisk together 3 cups of bread flour, remaining sugar, and salt. Create a well in the center and add the foamy yeast mixture, melted butter, and eggs.
- Mix until a shaggy dough forms, then turn out onto a lightly floured surface. Knead for 8-10 minutes, adding the remaining flour as needed, until the dough is smooth, elastic, and slightly tacky but not sticky. Pro tip: The dough should pass the windowpane test - you should be able to stretch a small piece thin enough to see light through it.
- Place the dough in a greased bowl, cover with a damp towel, and let rise in a warm, draft-free place for 1-1.5 hours, or until doubled in size. Pro tip: Create a warm environment by placing the bowl on top of your refrigerator or in an oven with just the light on.
- Punch down the risen dough and turn it out onto a lightly floured surface. Divide into 12 equal pieces (about 3 oz each if using a scale). Pro tip: For perfectly uniform rolls, weigh each piece - this ensures even baking and professional-looking results.
- Shape each piece into a smooth ball by rolling it under your cupped palm. Place the shaped rolls in your greased 9x13 inch pan, spacing them evenly with about 1/2 inch between each roll.
- Cover the shaped rolls with a damp towel and let rise for 45 minutes to 1 hour, until puffy and nearly doubled in size. Meanwhile, preheat your oven to 350°F (175°C).
- Brush the tops of the rolls with melted butter and bake for 18-22 minutes, until golden brown on top and the internal temperature reaches 190°F (88°C). Pro tip: Don't overbake - these rolls continue cooking from residual heat even after removing from the oven.
- Remove from oven and immediately brush with additional melted butter. Let cool in the pan for 5 minutes before serving warm.
Notes
- Pineapple juice should be warmed to exactly 110°F for proper yeast activation
- Dough should be slightly tacky but not sticky after kneading - add flour gradually
- Brush with melted butter both before and after baking for the signature soft, glossy crust
Tips for the Best Easy Hawaiian Rolls Recipe
- Temperature Matters: Use a thermometer to ensure your pineapple juice is the right temperature – too hot kills the yeast, too cool won’t activate it properly
- Don’t Over-flour: Add flour gradually during kneading – too much will result in dense, heavy rolls instead of light and fluffy ones
- Perfect Timing: Rising times can vary based on room temperature and humidity – look for visual cues rather than relying solely on the clock
- Brush with Butter: The secret to that signature glossy, soft crust is brushing with melted butter both before and after baking
- Test for Doneness: Rolls should sound hollow when tapped on the bottom and reach an internal temperature of 190°F
- Serve Warm: These rolls are at their absolute best when served warm – reheat leftovers gently in a low oven
Variations to Try
- Coconut Hawaiian Rolls: Replace 2 tablespoons of pineapple juice with coconut milk and add 1/4 cup sweetened shredded coconut to the dough
- Orange Hawaiian Rolls: Substitute orange juice for pineapple juice and add 1 tablespoon of orange zest for a citrusy twist
- Whole Wheat Version: Replace up to 1 cup of bread flour with whole wheat flour for added nutrition and nutty flavor
- Dinner Roll Sliders: Divide dough into 16 smaller pieces to create perfect slider-sized rolls for parties
- Cinnamon Sugar Rolls: Before the second rise, brush rolls with melted butter and sprinkle with cinnamon sugar for a sweet breakfast treat
Storage and Meal Prep Tips
- Room Temperature: Store in an airtight container for up to 3 days – brush with butter and warm in a 300°F oven for 5 minutes to refresh
- Refrigerator: Keep wrapped tightly for up to 1 week – bring to room temperature or warm slightly before serving
- Freezer Storage: Freeze baked rolls for up to 3 months in freezer bags – thaw overnight and warm in oven before serving
- Make-Ahead Tip: Prepare through shaping, then refrigerate overnight – let come to room temperature and complete second rise before baking
- Dough Freezing: Freeze shaped unbaked rolls on a tray, then transfer to bags – bake directly from frozen, adding 5-10 extra minutes
Nutritional Benefits
While Hawaiian rolls are certainly a treat, they do provide some nutritional value. The bread flour offers protein and B vitamins, while eggs contribute high-quality protein and essential amino acids. Pineapple juice adds vitamin C and natural enzymes that aid digestion.
- Good source of carbohydrates for quick energy
- Contains protein from eggs and flour for muscle maintenance
- Provides B vitamins essential for metabolism
- Pineapple juice offers vitamin C and antioxidants
- Made with real butter for vitamin A and healthy fats
What to Serve With Easy Hawaiian Rolls Recipe
- Holiday Ham: The sweet rolls perfectly complement savory glazed ham at Easter or Christmas dinner
- BBQ Pulled Pork: Use these rolls to make incredible pulled pork sandwiches with coleslaw
- Thanksgiving Turkey: Serve alongside traditional holiday sides for a sweet contrast to savory dishes
- Tropical Chicken: Perfect with teriyaki or pineapple-glazed chicken dishes
- Soup and Salad: These rolls make any simple soup and salad dinner feel more special
Frequently Asked Questions
Can I make Hawaiian rolls without pineapple juice?
While pineapple juice is traditional and provides the signature tropical flavor, you can substitute with orange juice, apple juice, or even milk. However, the taste will be different from authentic Hawaiian rolls. Pineapple juice also helps keep the rolls extra moist, so your results may be slightly less tender with other liquids.
How do I know when my Hawaiian roll dough has risen enough?
The dough should double in size during the first rise, which typically takes 1-1.5 hours depending on room temperature. For the second rise after shaping, the rolls should look puffy and nearly doubled – you can gently poke a roll with your finger, and if the indentation slowly springs back, they’re ready to bake.
Why are my homemade Hawaiian rolls dense instead of fluffy?
Dense rolls usually result from using too much flour, not kneading enough, or inactive yeast. Make sure your yeast foams properly during activation, knead the dough for the full 8-10 minutes until smooth and elastic, and add flour gradually – the dough should be slightly tacky but not sticky. Also ensure your rising environment is warm enough (75-80°F is ideal).
Can I make Hawaiian rolls ahead of time for a dinner party?
Absolutely! You can prepare the rolls through shaping, then cover and refrigerate overnight. The next day, let them come to room temperature (about 30 minutes), complete the second rise, and bake as directed. You can also bake them completely up to 2 days ahead and reheat in a 300°F oven for 5-7 minutes before serving.
What’s the difference between using bread flour vs all-purpose flour for Hawaiian rolls?
Bread flour has a higher protein content (12-14%) compared to all-purpose flour (10-12%), which creates more gluten development and results in a better structure and chewier texture perfect for yeast breads. While you can substitute all-purpose flour, bread flour will give you more authentic, bakery-quality results with better rise and texture.
Final Thoughts
Making homemade Hawaiian rolls might seem intimidating at first, but once you try this foolproof recipe, you’ll wonder why you ever bought store-bought versions. The process is incredibly rewarding, and your kitchen will smell absolutely amazing while these beauties bake to golden perfection.
These rolls have become a staple in my household for everything from holiday dinners to casual weeknight meals. There’s something special about breaking bread that you’ve made with your own hands, and the smiles on my family’s faces when I pull these golden beauties from the oven make every minute of preparation worth it. I hope this recipe brings as much joy to your table as it has to mine!
Ready to Try It?
Ready to fill your kitchen with the irresistible aroma of fresh-baked Hawaiian rolls? Gather your ingredients and give this recipe a try – I promise you’ll be amazed at how easy it is to create bakery-quality rolls at home. Don’t forget to share your beautiful results in the comments below, and tag us on social media so we can celebrate your baking success together!