Let me share my favorite gelatin trick recipe that never fails to impress guests at dinner parties. This stunning layered gelatin dessert looks like it came from a professional pastry chef, but it’s surprisingly simple when you know the right technique. The secret lies in understanding temperature control and timing – something I learned after years of trial and error in my own kitchen.
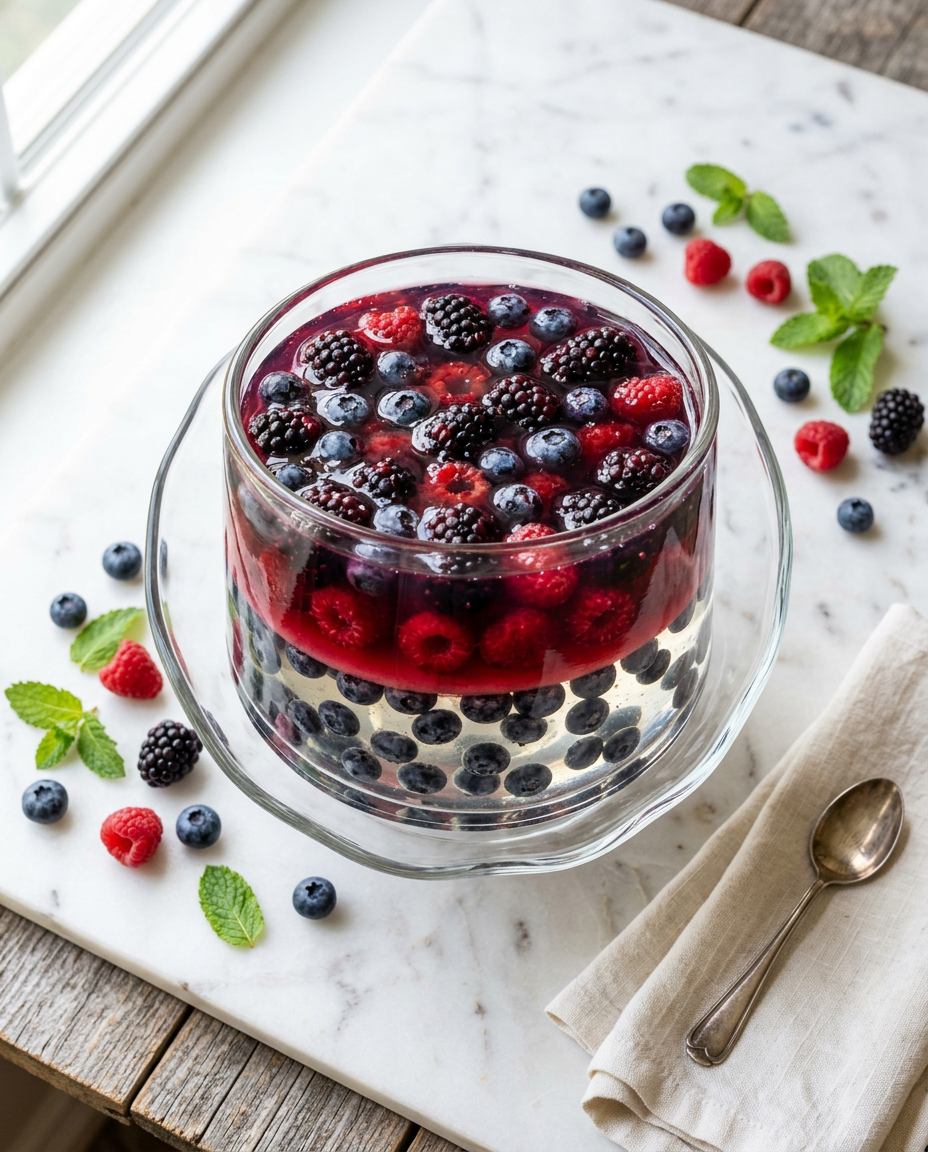
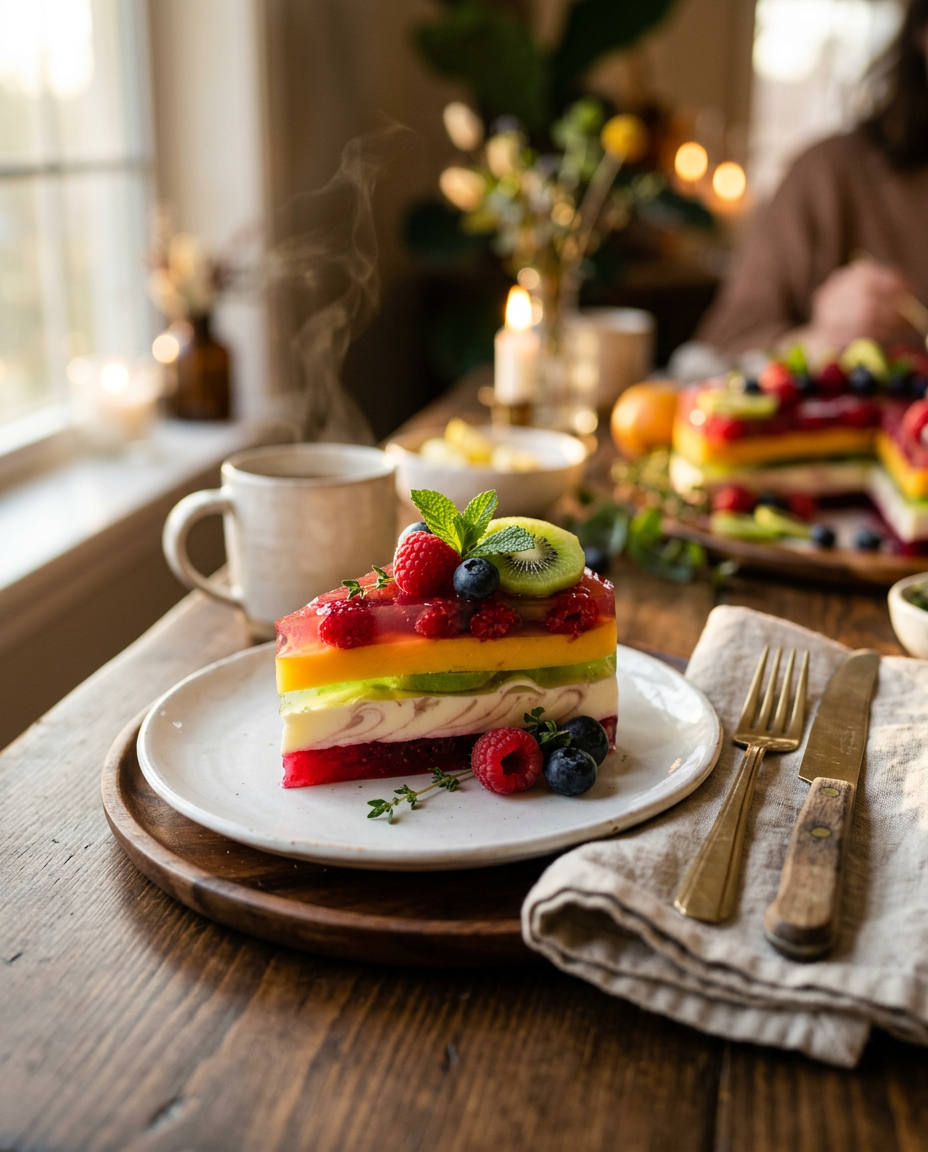
What makes this recipe special is the crystal-clear layers that suspend beautiful fruit pieces like little works of art. Each layer has the perfect texture – not too firm, not too soft – and the flavors complement each other beautifully. Once you master this jello trick technique, you’ll find yourself making variations for every occasion.
Why You’ll Love This Stunning Layered Gelatin Dessert with My Secret Trick
- Impressive Presentation: Creates stunning visual layers that look professionally made but use simple ingredients
- Make-Ahead Friendly: Perfect for entertaining since it must be prepared hours in advance
- Customizable Flavors: Works with any combination of gelatin flavors and fresh fruits
- Foolproof Technique: Once you learn the temperature trick, success is guaranteed every time
- Budget-Friendly: Uses inexpensive ingredients to create an elegant dessert
- Crowd Pleaser: Appeals to both kids and adults with its beautiful appearance and refreshing taste
Ingredients You’ll Need
The key to this gelatin dessert hack lies in using the right ratio of gelatin to liquid and understanding how temperature affects setting. I prefer using unflavored gelatin combined with fruit juices for more control over sweetness and flavor intensity. Fresh fruits add beautiful visual appeal, but choose varieties that won’t break down the gelatin enzymes.
Quality matters here – use clear, high-quality fruit juices for the most vibrant colors and clean flavors. The sugar helps balance any tartness and ensures proper setting, while the cold water is crucial for the blooming process that makes this technique work so well.
For the Clear Base Layer
- 2 packets unflavored gelatin (¼ oz each)
- ½ cup cold water (for blooming)
- 2 cups white grape juice (or clear apple juice)
- ¼ cup granulated sugar (adjust to taste)
For the Fruit Layers
- 1 packet unflavored gelatin (¼ oz)
- ¼ cup cold water (for blooming)
- 1 cup cranberry juice (100% juice)
- 2 tablespoons honey (or sugar)
- 1 cup mixed fresh berries (blueberries and raspberries)
For the Top Layer
- 1 packet unflavored gelatin (¼ oz)
- ¼ cup cold water (for blooming)
- 1 cup pomegranate juice (for beautiful color)
- 3 tablespoons sugar (to taste)
Optional Add-ins:
- fresh mint leaves
- edible flowers
- citrus zest
How to Make Stunning Layered Gelatin Dessert with My Secret Trick (Step-by-Step)
1. Prepare the Base Layer
Sprinkle 2 packets of unflavored gelatin over ½ cup cold water in a small bowl. Let bloom for 5 minutes until the gelatin absorbs the water and becomes spongy.
Pro tip: Never skip the blooming step – it prevents lumpy gelatin
Heat 1½ cups of white grape juice with sugar in a saucepan over medium heat until steaming but not boiling. Remove from heat and whisk in the bloomed gelatin until completely dissolved.
Pro tip: Strain the mixture through a fine mesh strainer to ensure smoothness
Let cool to room temperature, then pour into your serving bowl. Refrigerate for 45 minutes until just set but still slightly tacky to the touch.
Pro tip: This partial setting is crucial for layer adhesion
2. Create the Fruit Layer
While the base sets, bloom 1 packet gelatin in ¼ cup cold water. Heat cranberry juice with honey until warm, then dissolve the bloomed gelatin completely.
Pro tip: Cool this mixture to room temperature before proceeding
Gently arrange half the berries over the set base layer. Slowly pour the cooled cranberry mixture over the back of a spoon to avoid disturbing the fruit arrangement.
Pro tip: The spoon trick prevents the liquid from creating craters in your base layer
Refrigerate for another 45 minutes until this layer is just set. The surface should feel tacky but not liquid.
Pro tip: Test doneness by gently touching the center with a clean finger
3. Add the Final Layer
Prepare the pomegranate layer using the same blooming and heating technique. Allow it to cool completely to room temperature.
Pro tip: Temperature is critical here – hot liquid will melt your previous layers
Arrange remaining berries on the second layer, then carefully pour the pomegranate mixture using the spoon technique again.
Pro tip: Pour very slowly and steadily for the best results
4. Final Setting and Serving
Refrigerate the completed dessert for at least 3 hours or overnight until completely firm throughout.
Pro tip: Overnight setting gives the best texture and makes serving much easier
Before serving, let sit at room temperature for 5 minutes to make serving easier. Garnish with fresh mint if desired.
Pro tip: Dip your serving spoon in warm water between servings for clean cuts
Stunning Layered Gelatin Dessert with My Secret Trick – Full Recipe
Stunning Layered Gelatin Dessert with My Secret Trick
Ingredients
Equipment
Method
- Sprinkle 2 packets of unflavored gelatin over ½ cup cold water in a small bowl. Let bloom for 5 minutes until the gelatin absorbs the water and becomes spongy. Pro tip: Never skip the blooming step – it prevents lumpy gelatin
- Heat 1½ cups of white grape juice with sugar in a saucepan over medium heat until steaming but not boiling. Remove from heat and whisk in the bloomed gelatin until completely dissolved. Pro tip: Strain the mixture through a fine mesh strainer to ensure smoothness
- Let cool to room temperature, then pour into your serving bowl. Refrigerate for 45 minutes until just set but still slightly tacky to the touch. Pro tip: This partial setting is crucial for layer adhesion
- While the base sets, bloom 1 packet gelatin in ¼ cup cold water. Heat cranberry juice with honey until warm, then dissolve the bloomed gelatin completely. Pro tip: Cool this mixture to room temperature before proceeding
- Gently arrange half the berries over the set base layer. Slowly pour the cooled cranberry mixture over the back of a spoon to avoid disturbing the fruit arrangement. Pro tip: The spoon trick prevents the liquid from creating craters in your base layer
- Refrigerate for another 45 minutes until this layer is just set. The surface should feel tacky but not liquid. Pro tip: Test doneness by gently touching the center with a clean finger
- Prepare the pomegranate layer using the same blooming and heating technique. Allow it to cool completely to room temperature. Pro tip: Temperature is critical here – hot liquid will melt your previous layers
- Arrange remaining berries on the second layer, then carefully pour the pomegranate mixture using the spoon technique again. Pro tip: Pour very slowly and steadily for the best results
- Refrigerate the completed dessert for at least 3 hours or overnight until completely firm throughout. Pro tip: Overnight setting gives the best texture and makes serving much easier
- Before serving, let sit at room temperature for 5 minutes to make serving easier. Garnish with fresh mint if desired. Pro tip: Dip your serving spoon in warm water between servings for clean cuts
Notes
- Each layer must cool to room temperature before adding to prevent melting previous layers
- Previous layer should be set but still slightly tacky when adding next layer
- Avoid fresh pineapple, papaya, or kiwi as enzymes prevent proper gelatin setting
Tips for the Best Stunning Layered Gelatin Dessert with My Secret Trick
- Temperature Control: Always let each gelatin mixture cool to room temperature before adding to prevent melting previous layers
- Blooming Success: Use exactly the amount of cold water specified and let gelatin sit undisturbed for 5 full minutes
- Layer Adhesion: Each layer should be set but still slightly tacky when you add the next one
- Fruit Selection: Avoid fresh pineapple, papaya, or kiwi as their enzymes prevent proper setting
- Smooth Pouring: Always pour new layers over the back of a spoon to maintain clean boundaries
- Storage Success: Cover tightly with plastic wrap to prevent the surface from drying out
Variations to Try
- Tropical Paradise: Use coconut water, mango juice, and passion fruit with diced mango and coconut flakes
- Citrus Burst: Layer orange, lemon, and lime flavors with candied citrus peels suspended in each layer
- Berry Medley: Use different berry juices with corresponding fresh berries for an all-berry experience
- Wine Country: Replace some juice with white wine for an adult version with grapes and herb garnishes
- Holiday Special: Use cranberry and pomegranate with red and green colors for festive occasions
Storage and Meal Prep Tips
- Refrigerator Storage: Keeps perfectly for up to 4 days covered tightly with plastic wrap
- Freezer Storage: Not recommended as gelatin changes texture when frozen and thawed
- Make-Ahead Tips: Best made 1-2 days ahead to allow flavors to meld and ensure complete setting
- Serving Prep: Remove from refrigerator 5 minutes before serving for easier portioning
Nutritional Benefits
This layered gelatin dessert provides a light, refreshing treat that’s much lower in calories than traditional heavy desserts. The unflavored gelatin provides protein and supports joint health, while the fruit juices contribute vitamin C and antioxidants.
- Good source of protein from gelatin
- High in vitamin C from fruit juices
- Low in fat and cholesterol-free
- Contains beneficial antioxidants from berries
- Hydrating and refreshing
- Natural fruit sugars provide quick energy
What to Serve With Stunning Layered Gelatin Dessert with My Secret Trick
- Light vanilla wafers or shortbread cookies for textural contrast
- Fresh whipped cream or Greek yogurt for added richness
- Sparkling water with lime for a refreshing beverage pairing
- Cheese and fruit platters for an elegant dessert spread
- Coffee or herbal tea to balance the sweetness
Frequently Asked Questions
Can I make layered gelatin dessert ahead of time?
Yes, this gelatin trick recipe actually works best when made 1-2 days ahead. The layers need time to fully set and the flavors develop beautifully. Just cover tightly and refrigerate until ready to serve.
Why are my gelatin layers mixing together instead of staying separate?
The most common cause is adding hot gelatin mixture to already-set layers, which melts them. Always cool each mixture to room temperature before adding, and ensure the previous layer is set but still slightly tacky.
What fruits can I safely use in gelatin desserts?
Most fruits work well, but avoid fresh pineapple, papaya, kiwi, and mango as they contain enzymes that prevent gelatin from setting. Canned versions of these fruits are fine since the enzymes are deactivated during processing.
How do I prevent air bubbles in my layered gelatin?
Strain each gelatin mixture through a fine mesh strainer before using, let it cool slightly to reduce bubbling, and pour very slowly over the back of a spoon. Any surface bubbles can be gently skimmed off with a clean spoon.
Can I use flavored gelatin instead of unflavored for this recipe?
While you can substitute flavored gelatin, you’ll have less control over sweetness and flavor intensity. Use 1 package of flavored gelatin with 1 cup less liquid than the package directions call for to achieve the proper firmness for layering.
Final Thoughts
Mastering this gelatin layer method opens up endless possibilities for creative dessert making. Once you understand the temperature control and timing principles, you can experiment with different flavor combinations, add suspended fruits or even edible flowers, and create show-stopping desserts for any occasion.
The beauty of this easy gelatin recipe lies not just in its visual appeal, but in how it brings people together. I love watching guests’ faces light up when they see those perfect, clear layers for the first time. It’s a reminder that some of the most impressive culinary achievements come from understanding simple techniques and applying them with patience and care.
Ready to Try It?
Ready to impress your family and friends with this stunning gelatin trick recipe? Gather your ingredients and give it a try – I promise the results will exceed your expectations. Don’t forget to share your beautiful creations in the comments below, and let me know what flavor combinations you discover!