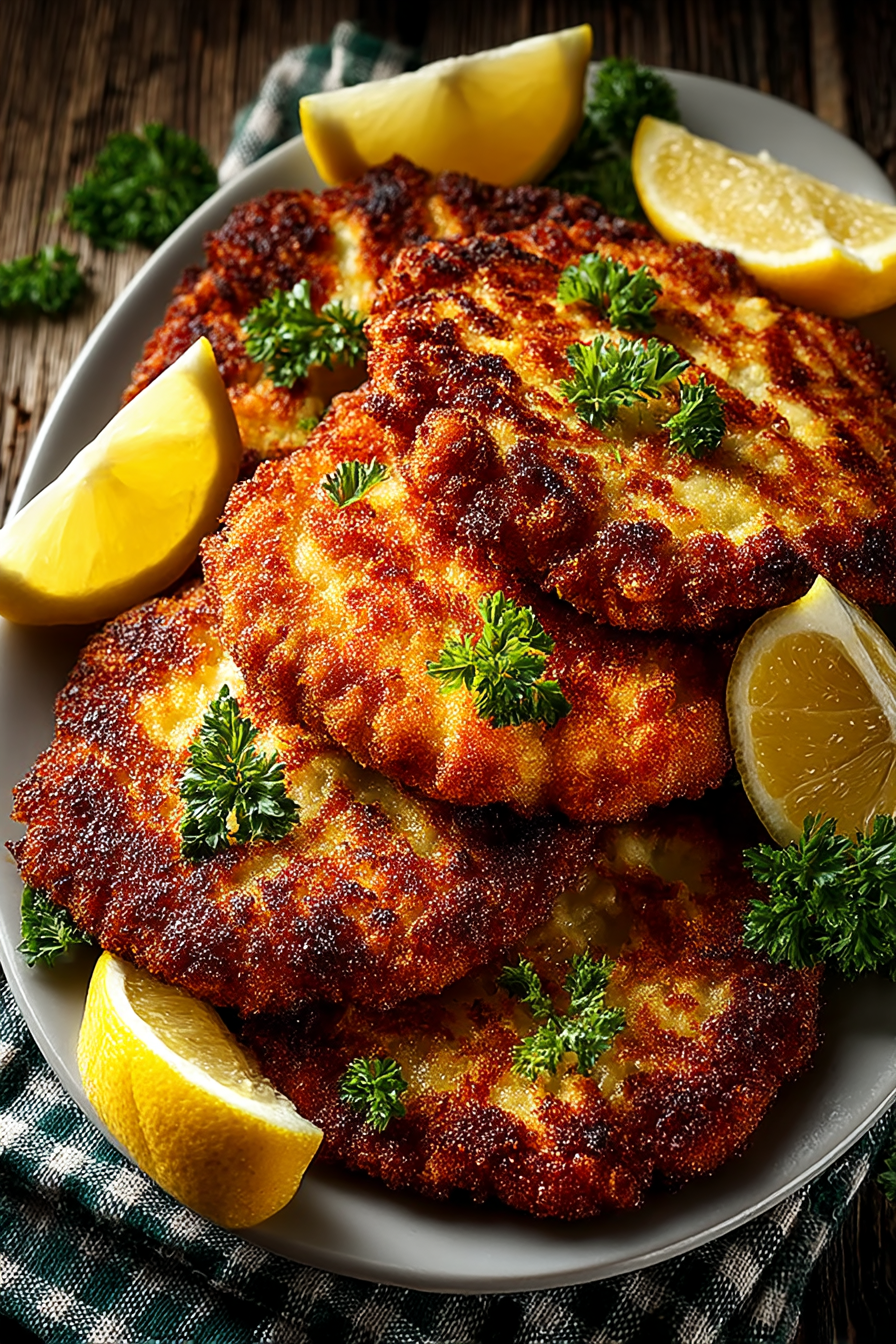
There’s something absolutely magical about a perfectly executed French pork schnitzel—that satisfying crunch when your fork pierces the golden exterior, followed by tender, juicy meat inside. This classic French pork schnitzel recipe has been a staple in European cuisine for generations, and once you master it, you’ll understand why home cooks and professional chefs alike keep returning to this elegant yet surprisingly simple dish. Whether you’re cooking for a special dinner or a casual weeknight meal, crispy pan-fried pork cutlets deliver restaurant-quality results in under 30 minutes.
What I absolutely love about this French breaded pork chops recipe is how approachable it truly is. You don’t need fancy equipment, rare ingredients, or culinary school training—just quality pork, a few pantry staples, and the confidence to let your pan do the heavy lifting. I’ve perfected this technique over years of cooking, and I’m thrilled to share every trick I’ve learned with you.
This homemade schnitzel cutlets recipe creates that coveted crispy exterior while keeping the meat incredibly moist and tender inside. The beauty of learning how to make schnitzel this way means you’ll have a go-to recipe that impresses every single time, whether you’re serving it with simple lemon wedges or an elegant cream sauce.
Why You’ll Love This Classic French Pork Schnitzel Recipe – Crispy Pan Fried Cutlets
- Crispy Exterior, Tender Interior: The double-dredging technique and proper pan temperature create an irresistibly crunchy crust while sealing in the meat’s natural juices for maximum tenderness.
- Quick and Easy: From prep to plate, this pork schnitzel recipe takes less than 30 minutes, making it perfect for busy weeknights while still feeling special enough for company.
- Elegant Presentation: Golden-brown cutlets plated with fresh herbs and lemon wedges instantly elevate your table setting and impress even the most discerning dinner guests.
- Incredibly Versatile: Easy pork schnitzel works beautifully alongside countless side dishes and sauces—serve it plain, with mushroom gravy, or topped with a fried egg for schnitzel Holstein.
- Budget-Friendly: This classic French pork dish uses affordable pork cutlets, making it an economical choice for feeding a family without sacrificing taste or quality.
- Teaches Essential Technique: Mastering this recipe builds foundational cooking skills that apply to countless other breaded and pan-fried dishes in your repertoire.
Ingredients You’ll Need
The beauty of authentic French pork schnitzel lies in its ingredient simplicity. Quality ingredients matter tremendously here since there’s nowhere for inferior components to hide—every element plays a starring role in the final dish. I recommend sourcing pork from a butcher if possible, as they can pound the cutlets to the perfect thickness, though I’ll show you exactly how to do it yourself at home.
For this crispy pan-fried pork cutlets recipe, you’ll be working with a straightforward breading station using all-purpose flour, beaten eggs, and crispy breadcrumbs. The key to exceptional results is using panko breadcrumbs instead of standard breadcrumbs, as the larger granules create a noticeably crispier crust that stays crunchy even as the schnitzel cools slightly.
For the Pork Schnitzel
- 4 pieces pork cutlets or thin-cut pork chops (about 4-5 oz each, approximately 1/4 inch thick)
- 1 teaspoon sea salt (plus more to taste)
- 1/2 teaspoon freshly ground black pepper (for best flavor)
- 1/2 teaspoon garlic powder (optional but recommended)
For the Breading Station
- 1 cup all-purpose flour (sifted into shallow dish)
- 2 large eggs (beaten with 1 tablespoon water)
- 1.5 cups panko breadcrumbs (for superior crispness)
For Pan-Frying
- 3 tablespoons butter (unsalted, for rich flavor)
- 2 tablespoons vegetable oil (avocado or canola works well)
- 2 whole fresh lemon wedges (for serving)
- 2 tablespoons fresh parsley (chopped, for garnish)
Optional Add-ins:
- Dijon mustard
- capers
- paprika
- white wine reduction
How to Make Classic French Pork Schnitzel Recipe – Crispy Pan Fried Cutlets (Step-by-Step)

1. Prep the Pork Cutlets
If your pork chops are thicker than 1/4 inch, place them between two pieces of plastic wrap and pound gently but firmly with a meat mallet until they reach uniform 1/4-inch thickness. This ensures even cooking throughout.
Pro tip: Pro tip: Pound from the center outward in gentle strokes rather than aggressive whacking—this creates an even thickness without tearing the meat fibers.
Pat the pork cutlets dry with paper towels. Moisture is the enemy of a crispy crust, so don’t skip this step even though it seems minor.
Pro tip: Consider patting the meat 15-20 minutes ahead of time—this allows surface moisture to evaporate naturally, creating an even drier exterior for breading.
Season both sides of each cutlet generously with salt, pepper, and garlic powder. Let rest for 5 minutes to allow seasoning to penetrate the meat.
Pro tip: Season just before breading rather than hours ahead, as salt can draw out moisture if left too long.
2. Set Up Your Breading Station
Arrange three shallow bowls or plates in a line: one with flour, one with beaten egg mixture, and one with panko breadcrumbs. This assembly-line setup makes breading efficient and keeps your workspace organized.
Pro tip: To keep your hands less messy, use your right hand for wet ingredients (egg) and your left hand for dry ingredients (flour and breadcrumbs)—this prevents a gummy coating on your fingers.
Beat the eggs with 1 tablespoon of water to create a thin, pourable egg wash that coats evenly without creating thick globs.
Pro tip: Fresh eggs create a better breading adhesion than older eggs, so use the freshest eggs available in your refrigerator.
3. Bread the Cutlets
Working with one cutlet at a time, dredge it thoroughly in flour, shaking off excess. This light flour coating helps the egg adhere better to the meat.
Pro tip: Don’t skip the flour step—this three-step breading process is what separates restaurant-quality results from soggy homemade attempts.
Dip the floured cutlet into the egg wash, turning to coat both sides completely and allowing excess to drip back into the bowl.
Pro tip: Make sure the egg reaches every corner and edge—any exposed flour or meat will create weak spots in the final crust.
Transfer to the breadcrumbs and press gently, turning to coat all sides thoroughly. Gently press the breadcrumbs into the egg coating with your fingers—you want them to adhere firmly.
Pro tip: For extra crispy results, place the breaded cutlet back in the egg wash for a quick second dip, then back into the breadcrumbs for a double-breaded effect.
Place breaded cutlets on a clean plate and let rest for 10-15 minutes. This resting period allows the breading to adhere properly and creates a better crust during cooking.
Pro tip: Don’t skip this resting time—I know it feels like it’s slowing you down, but those 10 minutes make a dramatic difference in the final texture.
4. Heat Your Pan and Oil
Place a large skillet over medium-high heat and add the butter and vegetable oil. The combination of butter (for flavor) and oil (for higher smoke point) creates ideal frying conditions.
Pro tip: The oil should be shimmering and moving around the pan, but not yet smoking. If you’re at the smoking stage, your pan is too hot and will burn the breading.
Test the oil temperature by carefully dropping a small piece of breadcrumb into the pan. If it sizzles immediately and browns in about 15-20 seconds, your oil is ready.
Pro tip: Ideally, your oil should reach 350-375°F. If you have a kitchen thermometer, this is where it becomes invaluable.
5. Pan-Fry the Schnitzel
Carefully place two breaded cutlets into the hot oil (cooking in batches prevents overcrowding and temperature drops). You should hear an immediate, vigorous sizzle upon contact.
Pro tip: Never crowd the pan—give each cutlet room to cook evenly. Overcrowding drops the oil temperature and creates steam instead of a crispy crust.
Cook for 3-4 minutes without moving the cutlets, allowing the bottom side to turn golden brown. This initial undisturbed cooking creates that signature crispy crust.
Pro tip: Listen and watch—the sizzle should remain steady. If it becomes quiet, your oil has cooled too much. If it sounds violent, it’s too hot.
Flip the cutlets carefully and cook for another 3-4 minutes until the second side is equally golden brown. The entire cutlet should be light golden, not dark brown.
Pro tip: Flip only once—resisting the urge to flip repeatedly is what separates home cooks from professionals. Trust the process.
Transfer cooked schnitzel to a paper towel-lined plate or wire rack to drain excess oil. The paper towels absorb surface grease without softening the crust (unlike keeping them in a warm oven).
Pro tip: A wire cooling rack is actually better than paper towels if you have one—it allows air circulation underneath and truly keeps the crust crispy.
Repeat with the remaining two cutlets, adding a bit more oil if needed to maintain the temperature.
Pro tip: Keep cooked schnitzel warm in a 200°F oven on a baking sheet if you’re staggering the cooking process.
6. Plate and Serve
Arrange the golden schnitzel cutlets on serving plates, garnish with fresh chopped parsley, and serve immediately with fresh lemon wedges on the side.
Pro tip: Squeeze fresh lemon juice over the schnitzel just before eating—the acidity cuts through the richness of the fried crust beautifully.
Classic French Pork Schnitzel Recipe – Crispy Pan Fried Cutlets – Full Recipe
Classic French Pork Schnitzel Recipe - Crispy Pan Fried Cutlets
Ingredients
Equipment
Method
- If your pork chops are thicker than 1/4 inch, place them between two pieces of plastic wrap and pound gently but firmly with a meat mallet until they reach uniform 1/4-inch thickness. This ensures even cooking throughout. Pro tip: Pro tip: Pound from the center outward in gentle strokes rather than aggressive whacking—this creates an even thickness without tearing the meat fibers.
- Pat the pork cutlets dry with paper towels. Moisture is the enemy of a crispy crust, so don't skip this step even though it seems minor. Pro tip: Consider patting the meat 15-20 minutes ahead of time—this allows surface moisture to evaporate naturally, creating an even drier exterior for breading.
- Season both sides of each cutlet generously with salt, pepper, and garlic powder. Let rest for 5 minutes to allow seasoning to penetrate the meat. Pro tip: Season just before breading rather than hours ahead, as salt can draw out moisture if left too long.
- Arrange three shallow bowls or plates in a line: one with flour, one with beaten egg mixture, and one with panko breadcrumbs. This assembly-line setup makes breading efficient and keeps your workspace organized. Pro tip: To keep your hands less messy, use your right hand for wet ingredients (egg) and your left hand for dry ingredients (flour and breadcrumbs)—this prevents a gummy coating on your fingers.
- Beat the eggs with 1 tablespoon of water to create a thin, pourable egg wash that coats evenly without creating thick globs. Pro tip: Fresh eggs create a better breading adhesion than older eggs, so use the freshest eggs available in your refrigerator.
- Working with one cutlet at a time, dredge it thoroughly in flour, shaking off excess. This light flour coating helps the egg adhere better to the meat. Pro tip: Don't skip the flour step—this three-step breading process is what separates restaurant-quality results from soggy homemade attempts.
- Dip the floured cutlet into the egg wash, turning to coat both sides completely and allowing excess to drip back into the bowl. Pro tip: Make sure the egg reaches every corner and edge—any exposed flour or meat will create weak spots in the final crust.
- Transfer to the breadcrumbs and press gently, turning to coat all sides thoroughly. Gently press the breadcrumbs into the egg coating with your fingers—you want them to adhere firmly. Pro tip: For extra crispy results, place the breaded cutlet back in the egg wash for a quick second dip, then back into the breadcrumbs for a double-breaded effect.
- Place breaded cutlets on a clean plate and let rest for 10-15 minutes. This resting period allows the breading to adhere properly and creates a better crust during cooking. Pro tip: Don't skip this resting time—I know it feels like it's slowing you down, but those 10 minutes make a dramatic difference in the final texture.
- Place a large skillet over medium-high heat and add the butter and vegetable oil. The combination of butter (for flavor) and oil (for higher smoke point) creates ideal frying conditions. Pro tip: The oil should be shimmering and moving around the pan, but not yet smoking. If you're at the smoking stage, your pan is too hot and will burn the breading.
- Test the oil temperature by carefully dropping a small piece of breadcrumb into the pan. If it sizzles immediately and browns in about 15-20 seconds, your oil is ready. Pro tip: Ideally, your oil should reach 350-375°F. If you have a kitchen thermometer, this is where it becomes invaluable.
- Carefully place two breaded cutlets into the hot oil (cooking in batches prevents overcrowding and temperature drops). You should hear an immediate, vigorous sizzle upon contact. Pro tip: Never crowd the pan—give each cutlet room to cook evenly. Overcrowding drops the oil temperature and creates steam instead of a crispy crust.
- Cook for 3-4 minutes without moving the cutlets, allowing the bottom side to turn golden brown. This initial undisturbed cooking creates that signature crispy crust. Pro tip: Listen and watch—the sizzle should remain steady. If it becomes quiet, your oil has cooled too much. If it sounds violent, it's too hot.
- Flip the cutlets carefully and cook for another 3-4 minutes until the second side is equally golden brown. The entire cutlet should be light golden, not dark brown. Pro tip: Flip only once—resisting the urge to flip repeatedly is what separates home cooks from professionals. Trust the process.
- Transfer cooked schnitzel to a paper towel-lined plate or wire rack to drain excess oil. The paper towels absorb surface grease without softening the crust (unlike keeping them in a warm oven). Pro tip: A wire cooling rack is actually better than paper towels if you have one—it allows air circulation underneath and truly keeps the crust crispy.
- Repeat with the remaining two cutlets, adding a bit more oil if needed to maintain the temperature. Pro tip: Keep cooked schnitzel warm in a 200°F oven on a baking sheet if you're staggering the cooking process.
- Arrange the golden schnitzel cutlets on serving plates, garnish with fresh chopped parsley, and serve immediately with fresh lemon wedges on the side. Pro tip: Squeeze fresh lemon juice over the schnitzel just before eating—the acidity cuts through the richness of the fried crust beautifully.
Notes
- Pat pork completely dry before breading—moisture is the enemy of crispiness. Do this 15-20 minutes before breading if possible to allow surface moisture to evaporate naturally.
- Maintain oil temperature between 350-375°F throughout cooking. If oil is too cool, schnitzel absorbs oil and becomes greasy; if too hot, the breading burns before the meat cooks through.
- Don't skip the 10-15 minute resting period after breading but before cooking. This allows the breading to set and adhere properly, dramatically improving the final texture and crispiness.
Tips for the Best Classic French Pork Schnitzel Recipe – Crispy Pan Fried Cutlets
- Pound Evenly: Uniform thickness is absolutely crucial for even cooking. If some parts are thicker than others, thin areas will overcook while thick parts remain underdone. Invest 2 minutes in proper pounding.
- Keep Oil Temperature Consistent: The difference between crispy and greasy schnitzel comes down to maintaining proper oil temperature throughout cooking. Too cool and you get soggy breading; too hot and it burns. Aim for 350-375°F.
- Pat Your Meat Dry: This cannot be overstated—moisture is the sworn enemy of crispy breading. Pat your pork completely dry with paper towels right before breading for the crispiest possible exterior.
- Don’t Skip the Resting Periods: The 10-15 minute rest after breading and the moment you take schnitzel out of the pan are both important. These pauses allow the proteins to relax and the breading to set properly.
- Use Panko, Not Regular Breadcrumbs: Panko’s larger granules create dramatically superior crispness compared to standard breadcrumbs. This single ingredient swap elevates your results noticeably.
- Double-Bread for Maximum Crispness: For extra-crispy schnitzel, dip the breaded cutlet back into the egg wash and then into breadcrumbs a second time. This double-breading technique creates an incredibly crunchy exterior.
Variations to Try
- Schnitzel with Mushroom Cream Sauce: After cooking the schnitzel, sauté sliced mushrooms in the same pan, add white wine and heavy cream, simmer until thickened, and spoon over the cutlets for an elegant Bavarian-style variation.
- Schnitzel Holstein: Top each crispy schnitzel with a fried egg, anchovy fillets, and capers for this classic Austrian presentation that transforms the dish into something truly special.
- Herb-Crusted Variation: Mix 2 tablespoons of finely chopped fresh herbs (parsley, thyme, or oregano) into your panko breadcrumbs before breading for aromatic, herbaceous results.
- Lighter Oven-Baked Version: Spray breaded cutlets with cooking spray, place on a greased baking sheet, and bake at 400°F for 12-15 minutes, turning halfway through. Not quite as crispy as pan-fried but significantly lighter.
- Spicy Schnitzel: Add 1/2 teaspoon cayenne pepper and 1/2 teaspoon smoked paprika to your breadcrumb mixture for a subtle heat that complements the richness beautifully.
- Pork Schnitzel with Caper-Lemon Sauce: Create a quick pan sauce by adding a squeeze of fresh lemon juice and a tablespoon of capers to the pan drippings, letting it warm for 30 seconds, then drizzling over the finished schnitzel.
Storage and Meal Prep Tips
- Refrigerator Storage: Store leftover schnitzel in an airtight container for up to 3 days. The breading will soften slightly when refrigerated, but the schnitzel remains delicious. Allow to come to room temperature for 15 minutes before serving or gently reheat.
- Freezer Storage: Both uncooked (breaded but raw) and cooked schnitzel freeze beautifully for up to 3 months. Freeze uncooked schnitzel on a baking sheet before transferring to freezer bags—this prevents them from sticking together. Cooked schnitzel should cool completely before freezing in a single layer on a baking sheet, then transferred to freezer bags.
- Reheating Cooked Schnitzel: For the crispiest results, reheat in a 375°F oven for 8-10 minutes on a wire rack set over a baking sheet. The rack allows air circulation underneath, preventing the bottom from becoming soggy. Avoid microwaving, which makes the breading rubbery.
- Cooking from Frozen: Uncooked frozen schnitzel can go directly into hot oil—simply add 1-2 minutes to the cooking time since the meat needs to thaw and cook through. Don’t thaw first, as this compromises the texture.
- Meal Prep Strategy: Prepare and bread your schnitzel cutlets up to 24 hours ahead, storing them on a baking sheet in the refrigerator covered with plastic wrap. Cook when ready to serve for fresh, hot schnitzel with minimal last-minute effort.
Nutritional Benefits
This classic French pork schnitzel recipe delivers substantial nutritional benefits alongside its satisfying flavor. Pork is an excellent source of high-quality lean protein, B vitamins (especially thiamine and niacin), and essential minerals like selenium and phosphorus. While the breading and pan-frying process adds calories and fat, the nutritional payoff includes the fat-soluble vitamins absorbed more effectively when consumed with the fat from cooking oil, plus the satisfying nature of schnitzel means smaller portions genuinely feel complete and indulgent.
- High-Quality Protein: Each serving delivers approximately 35-40 grams of protein, making schnitzel an excellent choice for muscle maintenance and satiety
- B Vitamins: Pork is rich in thiamine, riboflavin, and niacin, supporting energy metabolism and nervous system function
- Mineral-Rich: Selenium, phosphorus, and zinc from pork support immune function and bone health
- Satisfying Portion: The rich, crispy exterior and tender interior create a psychologically satisfying dish, meaning you’ll eat less overall compared to lighter preparations
- Quick Energy Source: The combination of protein and carbohydrates from the breadcrumb coating provides sustained energy throughout the day
What to Serve With Classic French Pork Schnitzel Recipe – Crispy Pan Fried Cutlets
- Classic Lemon and Fresh Herbs: Serve schnitzel with fresh lemon wedges and a simple salad of arugula tossed in lemon vinaigrette—the brightness cuts through the richness perfectly.
- Creamy Mushroom Sauce with Buttered Noodles: Pair with a velvety mushroom cream sauce spooned over the schnitzel, served alongside buttered egg noodles for an elegant, restaurant-style presentation.
- Potatoes and Green Vegetables: Serve alongside crispy roasted potatoes and blanched green beans with a drizzle of herb butter—this traditional pairing never disappoints.
- Light Cucumber and Dill Salad: Balance the richness of fried schnitzel with a refreshing Austrian-style cucumber salad dressed in light vinegar and fresh dill for contrast.
- Red Cabbage Slaw with Vinegar: A tangy, crunchy red cabbage slaw dressed in apple cider vinegar provides brightness and textural contrast to the crispy cutlets.
Frequently Asked Questions
What’s the best way to pound pork cutlets without making them tough?
Use a meat mallet’s flat side and pound gently from the center outward in even strokes rather than aggressive whacking. The goal is to evenly flatten the meat to 1/4-inch thickness without tearing the muscle fibers. Place meat between plastic wrap to prevent splashing, and work methodically rather than forcefully. Gentle, even pressure creates tender schnitzel; aggressive pounding can damage the meat structure.
Can I make pork schnitzel ahead of time?
Absolutely! You can bread your schnitzel cutlets up to 24 hours in advance, storing them on a baking sheet covered with plastic wrap in the refrigerator. This is actually ideal because the breading adheres better after resting in the cold. You can also freeze uncooked breaded schnitzel for up to 3 months—simply transfer the baking sheet to the freezer once frozen, then store in freezer bags. Cook directly from frozen, adding 1-2 minutes to the cooking time.
Why does my schnitzel breading come off or get soggy?
Two main culprits cause this issue: insufficient drying of the meat before breading (moisture prevents adhesion) and oil temperature that’s too low during cooking (which steams the meat instead of crisping the breading). Always pat your pork completely dry with paper towels right before breading. Maintain oil temperature between 350-375°F—use a thermometer if needed. Also ensure you’re using the three-step breading method: flour, egg wash, then breadcrumbs. Skipping steps significantly reduces adhesion.
How thick should pork cutlets be for schnitzel?
The ideal thickness for schnitzel is 1/4 inch (about 6mm). This thickness allows the exterior to achieve a beautiful golden crust while the interior cooks through in approximately 3-4 minutes per side without the meat drying out. Too thin (under 1/4 inch) and the cutlets become tough and cook too quickly; too thick (over 1/4 inch) and the breading burns before the interior is done. Most butchers can pound your cutlets to this thickness if you ask, or it takes just 2-3 minutes to do yourself.
What oil should I use for pan-frying schnitzel?
The best approach is combining butter with a high-smoke-point oil like vegetable, canola, or avocado oil. Use a 1:1 ratio of butter to oil (3 tablespoons butter to 2 tablespoons oil for this recipe). The butter provides rich flavor while the oil raises the smoke point to the 350-375°F range needed for proper cooking. Never use olive oil alone—its lower smoke point burns at schnitzel’s ideal cooking temperature. Butter alone can burn as well, which is why combining both is the professional approach.
Final Thoughts
After cooking this classic French pork schnitzel recipe countless times, I can honestly say it’s become one of my most-reached-for meals when I want something that feels simultaneously indulgent and completely approachable. There’s something deeply satisfying about that moment when you plate golden-brown cutlets and hear them still crackling slightly from residual heat, knowing that in just 30 minutes you’ve created something genuinely impressive. This is the kind of dish that transforms an ordinary Tuesday night into something special, yet requires nothing more than basic ingredients and fundamental cooking technique.
The beauty of mastering this recipe extends far beyond the schnitzel itself. The breading and pan-frying technique applies to chicken cutlets, veal, fish, and even eggplant. Once you understand the principles—proper pounding, complete drying, three-step breading, correct oil temperature, and resting periods—you unlock a whole category of elegant, crispy-exterior dishes that become staples in your cooking repertoire. I genuinely believe that every home cook should master how to make schnitzel, because it teaches fundamental skills that elevate your overall cooking confidence.
Ready to Try It?
I’d absolutely love to hear about your experience making this French pork schnitzel at home! Whether this is your first time attempting schnitzel or you’re a seasoned pro with your own techniques, please drop a comment below and let me know how it turned out. Did you try any variations? What side dishes did you pair it with? Share your photos on social media and tag AppetizingIdeas—I read every comment and engage with our community. And if you found this recipe helpful, please share it with a friend who loves elegant yet simple cooking. Happy schnitzel-making!