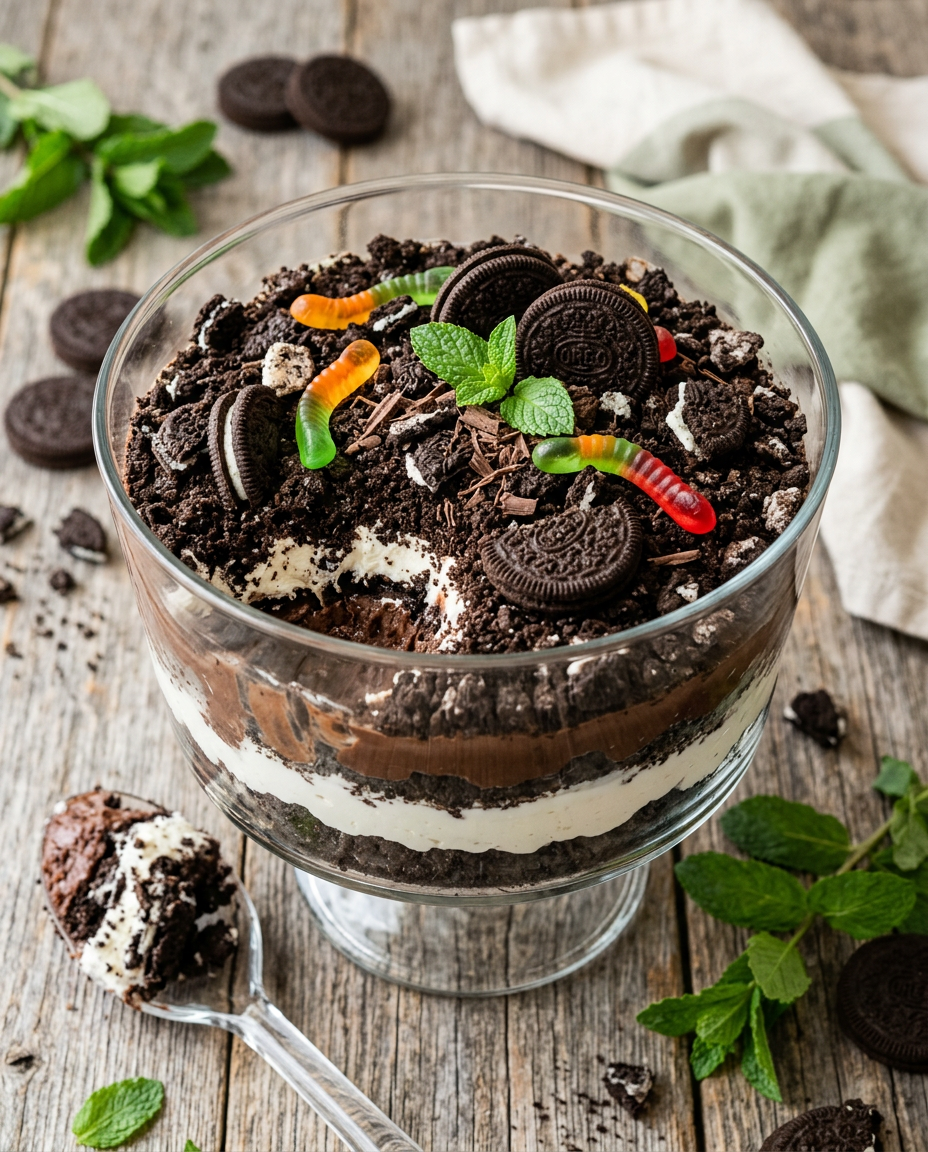
If you’re looking for a dessert that’s both delicious and entertaining, a classic dirt cake recipe is your answer! This whimsical no-bake treat combines rich chocolate pudding, crumbly cookie crumbles, and a touch of nostalgia that appeals to kids and adults alike. Whether you’re hosting a garden-themed party or simply craving something sweet and fun, this homemade dirt cake delivers impressive results with minimal effort.
I first made a classic dirt cake recipe for my son’s birthday party years ago, and it became an instant family favorite. The beauty of this dessert lies in its simplicity—there’s no baking required, and you likely have most ingredients already in your pantry. Plus, the visual appeal of this chocolate pudding dirt cake is undeniable, making it a showstopper at any gathering.
In this complete guide, I’ll walk you through every step of creating the perfect dirt cake with crushed oreos, share my favorite variations, and reveal the secrets to making this easy dirt cake taste restaurant-quality. Let’s dig in!
Why You’ll Love This Classic Dirt Cake Recipe
- No-Bake Convenience: This dirt cake dessert requires zero oven time, making it perfect for hot summer days or when you’re short on time.
- Kid-Approved Fun: Kids dirt cake recipe fans love the interactive nature of building layers and adding the “dirt” topping—it’s almost as fun to make as it is to eat.
- Budget-Friendly: Made with affordable pantry staples like chocolate pudding, cookies, and whipped cream, this homemade dirt cake won’t break the bank.
- Customizable Flavors: Easily adapt the classic dirt cake recipe with different pudding flavors, cookie varieties, or additional mix-ins to suit your taste preferences.
- Make-Ahead Friendly: Prepare this easy dirt cake up to 24 hours in advance, making it ideal for meal prep or party planning.
- Impressive Presentation: Despite its simple ingredients, a chocolate dirt cake looks elaborate and impressive, perfect for impressing guests.
Ingredients You’ll Need
The beauty of a classic dirt cake recipe lies in its straightforward ingredient list. You’ll need quality chocolate pudding mix, whole milk, whipped cream, and crushed cookies to create those authentic “dirt” layers. The combination of creamy pudding and crispy cookie crumbles creates the perfect texture contrast that makes this dessert so addictive.
When selecting ingredients for your dirt cake with crushed oreos, opt for full-fat versions where possible—they create a richer, more indulgent flavor. You can use traditional Oreo cookies, chocolate wafers, or even brownie crumbles if you want to elevate your easy dirt cake even further. Don’t skip the vanilla extract, as it adds depth to the pudding layer that truly makes this chocolate dirt cake shine.
For the Pudding Layer
- 2 packages instant chocolate pudding mix ((3.9 oz each))
- 3 cups cold whole milk (for richness)
- 1 teaspoon vanilla extract (optional but recommended)
For the Cream Layer
- 2 cups heavy whipping cream (cold)
- 3 tablespoons granulated sugar
- 1 teaspoon vanilla extract
For the Dirt Topping
- 2 cups crushed Oreo cookies (about 20-24 cookies, finely crushed)
- 4 tablespoons melted butter (mixed with crushed cookies)
- 2 tablespoons chocolate sprinkles (optional garnish)
Optional Add-ins:
- chocolate chips
- gummy worms
- instant coffee powder
- crushed brownies
How to Make Classic Dirt Cake Recipe (Step-by-Step)
1. Prepare the Cookie Crumbles
Place Oreo cookies (keeping some whole for garnish) into a food processor and pulse until you achieve a fine, sand-like texture resembling actual dirt. Transfer crushed cookies to a bowl and mix in melted butter until the mixture resembles wet sand. Set aside.
Pro tip: Don’t over-process—you want some texture variation in your dirt cake topping, not a fine flour. Some slightly larger crumbs add authenticity.
2. Make the Chocolate Pudding Layer
Pour cold milk into a large mixing bowl. Add chocolate pudding mix packets and whisk vigorously for 2 minutes until smooth and fully combined. Stir in vanilla extract for added depth of flavor.
Pro tip: Use an electric mixer on low speed for the smoothest pudding with no lumps. The pudding will thicken as it sits.
Let the pudding rest for 5 minutes to reach proper consistency before layering. This resting time is crucial for achieving the perfect texture in your classic dirt cake recipe.
Pro tip: If your pudding seems too thick, you can thin it slightly with an extra splash of milk, but be conservative—you don’t want runny pudding.
3. Whip the Cream Layer
In a separate bowl, pour cold heavy whipping cream and beat with an electric mixer on high speed. When soft peaks form, gradually add granulated sugar and vanilla extract.
Pro tip: Keep the mixer bowl and beaters in the freezer for 10 minutes before whipping—cold equipment creates fluffier whipped cream.
Continue beating until stiff peaks form—this typically takes 3-4 minutes total. Be careful not to over-beat, or you’ll end up with butter.
Pro tip: You can make homemade whipped cream up to 4 hours ahead and refrigerate it in a piping bag for convenience.
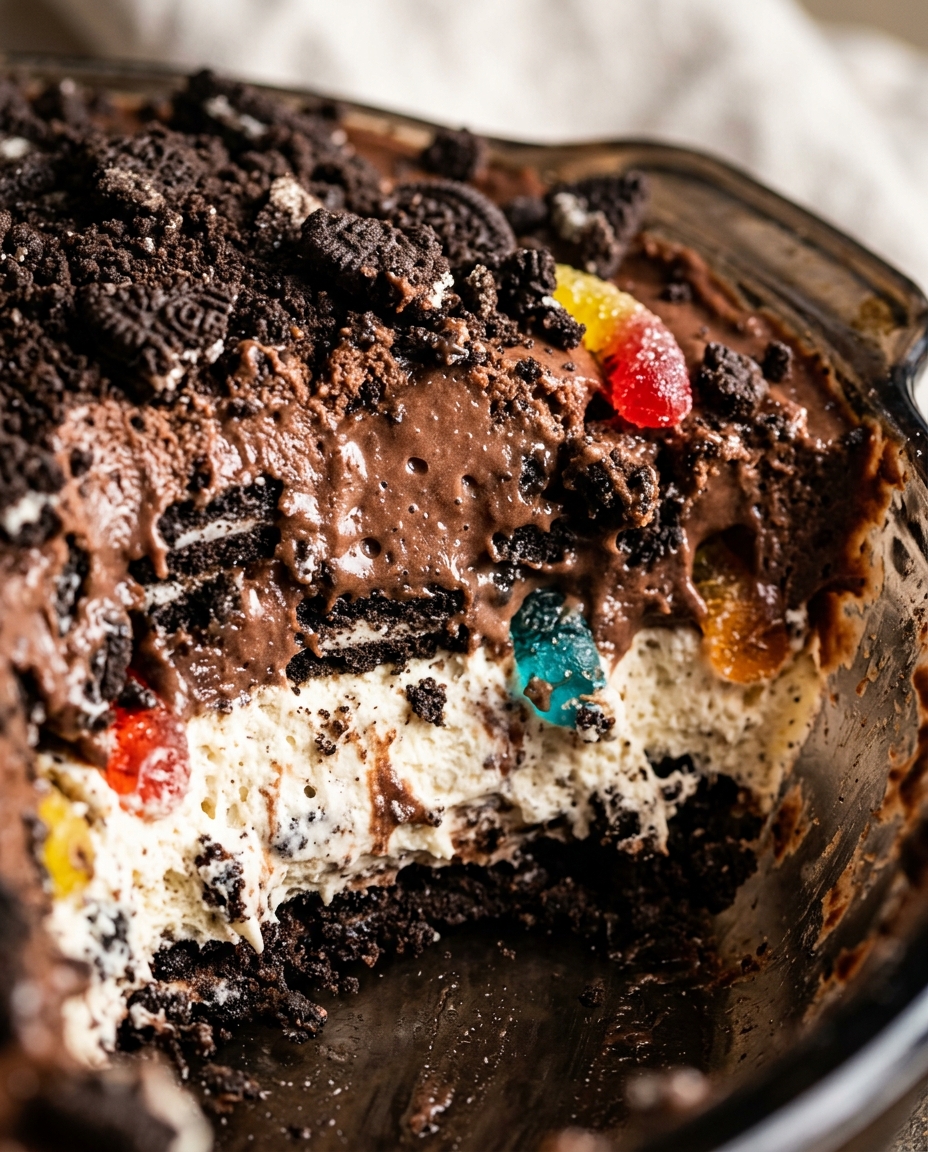
4. Layer Your Dirt Cake
In your clear glass bowl, spread a thin layer of chocolate pudding on the bottom (about 1 cup). This pudding layer is the foundation of your dirt cake with crushed oreos.
Pro tip: Using a clear bowl is key—your guests will love seeing the beautiful layers through the glass!
Sprinkle a generous layer of buttered cookie crumbles over the pudding, using about one-third of your mixture. You’re creating distinct layers in your chocolate dirt cake.
Pro tip: Pat the cookie layer gently so it stays in place and doesn’t sink into the pudding too much.
Add another layer of chocolate pudding (about 1 cup), then more cookie crumbles. Repeat until you’ve layered most of your ingredients, finishing with the pudding layer.
Pro tip: Alternate pudding and dirt layers 3-4 times total for the most visually impressive easy dirt cake.
Spread the whipped cream over the top layer of pudding, then finish with a generous mound of remaining buttered cookie crumbles. This crowning layer of “dirt” is what makes your homemade dirt cake instantly recognizable.
Pro tip: Save some whole Oreo halves and chocolate sprinkles to sprinkle on top for extra visual appeal.
5. Chill and Set
Cover your dirt cake dessert loosely with plastic wrap and refrigerate for at least 2-3 hours before serving. This chilling time allows the layers to set and flavors to meld beautifully.
Pro tip: For the best texture and flavor, chill overnight if possible. This no-bake dirt cake actually improves as it sits.
6. Serve and Enjoy
Remove your classic dirt cake recipe creation from the refrigerator 10 minutes before serving to take the chill off slightly. Use a large serving spoon to scoop through all the layers, ensuring each portion gets pudding, cream, and cookie crumbles.
Pro tip: Serve in parfait glasses or bowls so guests can see all those gorgeous layers. You can also pre-portion individual cups for easy entertaining.
Classic Dirt Cake Recipe – Full Recipe
Classic Dirt Cake Recipe
Ingredients
Equipment
Method
- Place Oreo cookies (keeping some whole for garnish) into a food processor and pulse until you achieve a fine, sand-like texture resembling actual dirt. Transfer crushed cookies to a bowl and mix in melted butter until the mixture resembles wet sand. Set aside. Pro tip: Don't over-process—you want some texture variation in your dirt cake topping, not a fine flour. Some slightly larger crumbs add authenticity.
- Pour cold milk into a large mixing bowl. Add chocolate pudding mix packets and whisk vigorously for 2 minutes until smooth and fully combined. Stir in vanilla extract for added depth of flavor. Pro tip: Use an electric mixer on low speed for the smoothest pudding with no lumps. The pudding will thicken as it sits.
- Let the pudding rest for 5 minutes to reach proper consistency before layering. This resting time is crucial for achieving the perfect texture in your classic dirt cake recipe. Pro tip: If your pudding seems too thick, you can thin it slightly with an extra splash of milk, but be conservative—you don't want runny pudding.
- In a separate bowl, pour cold heavy whipping cream and beat with an electric mixer on high speed. When soft peaks form, gradually add granulated sugar and vanilla extract. Pro tip: Keep the mixer bowl and beaters in the freezer for 10 minutes before whipping—cold equipment creates fluffier whipped cream.
- Continue beating until stiff peaks form—this typically takes 3-4 minutes total. Be careful not to over-beat, or you'll end up with butter. Pro tip: You can make homemade whipped cream up to 4 hours ahead and refrigerate it in a piping bag for convenience.
- In your clear glass bowl, spread a thin layer of chocolate pudding on the bottom (about 1 cup). This pudding layer is the foundation of your dirt cake with crushed oreos. Pro tip: Using a clear bowl is key—your guests will love seeing the beautiful layers through the glass!
- Sprinkle a generous layer of buttered cookie crumbles over the pudding, using about one-third of your mixture. You're creating distinct layers in your chocolate dirt cake. Pro tip: Pat the cookie layer gently so it stays in place and doesn't sink into the pudding too much.
- Add another layer of chocolate pudding (about 1 cup), then more cookie crumbles. Repeat until you've layered most of your ingredients, finishing with the pudding layer. Pro tip: Alternate pudding and dirt layers 3-4 times total for the most visually impressive easy dirt cake.
- Spread the whipped cream over the top layer of pudding, then finish with a generous mound of remaining buttered cookie crumbles. This crowning layer of "dirt" is what makes your homemade dirt cake instantly recognizable. Pro tip: Save some whole Oreo halves and chocolate sprinkles to sprinkle on top for extra visual appeal.
- Cover your dirt cake dessert loosely with plastic wrap and refrigerate for at least 2-3 hours before serving. This chilling time allows the layers to set and flavors to meld beautifully. Pro tip: For the best texture and flavor, chill overnight if possible. This no-bake dirt cake actually improves as it sits.
- Remove your classic dirt cake recipe creation from the refrigerator 10 minutes before serving to take the chill off slightly. Use a large serving spoon to scoop through all the layers, ensuring each portion gets pudding, cream, and cookie crumbles. Pro tip: Serve in parfait glasses or bowls so guests can see all those gorgeous layers. You can also pre-portion individual cups for easy entertaining.
Notes
- Crush Oreo cookies in a food processor until they resemble wet sand, then mix with melted butter for the perfect 'dirt' texture
- Prepare this no-bake dirt cake at least 3 hours (preferably overnight) ahead for best flavor as the layers meld together
- Use clear glass bowls or individual parfait cups to showcase the beautiful layered presentation of this classic dirt cake recipe
Tips for the Best Classic Dirt Cake Recipe
- Use Full-Fat Dairy: Don’t skip the heavy cream and whole milk—they create the rich, indulgent texture that makes this chocolate dirt cake irresistible. Light versions won’t whip as well or taste as decadent.
- Crush Cookies Strategically: For your dirt cake with crushed oreos, pulse cookies in a food processor in short bursts. You want texture variation—some fine crumbs mixed with slightly larger pieces that resemble actual dirt.
- Keep Everything Cold: Cold pudding, cold cream, and cold equipment all contribute to the perfect texture for this easy dirt cake. Warm ingredients create a soupy, disappointing result.
- Make It Ahead: This no-bake dirt cake actually tastes better after sitting overnight in the fridge. The cookie crumbles soften slightly and absorb chocolate flavor, creating a more cohesive dessert.
- Don’t Skip the Vanilla: Adding vanilla extract to both the pudding and whipped cream layers elevates your kids dirt cake recipe from ordinary to extraordinary by adding depth and complexity.
- Layer Generously: This isn’t the time to be shy with portions. Generous layers of pudding, cream, and cookies create the impressive presentation that makes a homemade dirt cake so special.
Variations to Try
- Cookies and Cream Dirt Cake: Substitute vanilla instant pudding for chocolate and use crushed vanilla wafers or crushed white chocolate-covered cookies for a lighter variation of the classic dirt cake recipe.
- Mocha Dirt Cake: Dissolve 1 tablespoon of instant coffee powder in the milk before adding pudding mix to create a sophisticated coffee-chocolate flavor in your chocolate dirt cake.
- Brownie Dirt Cake: Crumble store-bought brownies and mix with crushed Oreos for the topping layer. You can also add chocolate fudge between pudding layers for an extra-indulgent version of this dirt cake with crushed oreos.
- Peanut Butter Dirt Cake: Layer chocolate pudding with creamy peanut butter pudding, and use chocolate-covered peanut cookie crumbles for the “dirt” topping—kids will love this easy dirt cake variation.
- Mint Chocolate Dirt Cake: Use chocolate mint instant pudding or add peppermint extract to regular chocolate pudding. Top with crushed mint chocolate cookies for a refreshing take on the traditional dirt cake dessert.
- No-Bake Dirt Cake with Brownies: Layer prepared brownies (from a mix or homemade) with pudding and cream, then crumble additional brownies for the topping instead of cookies for an extra fudgy homemade dirt cake.
Storage and Meal Prep Tips
- Refrigerator Storage: Keep your covered classic dirt cake recipe in the refrigerator for up to 3 days. The flavors actually improve after the first day as the layers meld together. Cover tightly with plastic wrap to prevent the pudding from absorbing refrigerator odors.
- Freezer Storage: You can freeze a no-bake dirt cake for up to 2 weeks, though the whipped cream layer may become slightly grainy after thawing. Freeze uncovered for 2 hours, then wrap tightly in plastic wrap and aluminum foil.
- Thawing Instructions: If frozen, transfer your chocolate dirt cake to the refrigerator 4-6 hours before serving or overnight for best results. Never thaw at room temperature as the pudding layer can become unstable.
- Individual Portions: Layer this easy dirt cake recipe in individual clear cups or mason jars for single servings. These can be refrigerated for up to 3 days and are perfect for meal prep or gifting to friends.
- Transport Tips: If bringing your kids dirt cake recipe to a party, keep it in a cool insulated container with ice packs. The pudding layer can soften if left at room temperature, so transport and serve within 2 hours of leaving your home.
Nutritional Benefits
While this classic dirt cake recipe is undeniably a treat, it does offer some nutritional components worth noting. The chocolate pudding provides a bit of calcium and iron, while the cream layer contributes some vitamin A. The cookies add a touch of fiber, though this is primarily a dessert meant for enjoyment rather than nutritional benefit. When sharing with kids or at parties, portion sizes can be kept reasonable while still delivering maximum satisfaction.
- Calcium Source: The milk and cream in this chocolate dirt cake contribute to daily calcium intake, supporting bone health.
- Antioxidants: Chocolate in the pudding layer contains beneficial antioxidants, though sugar content should be moderated.
- Mood Booster: Chocolate is known to trigger serotonin and endorphins, making this dirt cake dessert not just tasty but mood-enhancing too!
What to Serve With Classic Dirt Cake Recipe
- Fresh Berries: Serve alongside fresh strawberries, raspberries, or blueberries to add brightness and cut through the richness of the chocolate dirt cake.
- Whipped Cream Dollop: A simple dollop of additional fresh whipped cream on top of individual servings adds elegance and extra indulgence to your easy dirt cake.
- Coffee or Hot Chocolate: Pair this chocolate pudding dirt cake with a warm beverage—coffee with the no-bake dirt cake offers sophisticated contrast, while hot chocolate suits kids dirt cake recipe perfectly.
- Fresh Mint Leaves: Add fresh mint sprigs as garnish and flavor accent, especially if making the mint chocolate variation of this classic dirt cake recipe.
- Fruit Coulis or Berry Sauce: A homemade raspberry or strawberry sauce drizzled on the plate elevates presentation and adds tartness that balances the sweetness of the chocolate dirt cake.
Frequently Asked Questions
Can I make a classic dirt cake recipe without crushed Oreos?
Absolutely! While Oreos are traditional for this dirt cake with crushed oreos, you can substitute with crushed chocolate wafers, chocolate graham crackers, crushed brownies, or even chocolate-covered pretzels. The key is having a crumbly chocolate topping that resembles dirt. Mixing butter with your cookie crumbles helps them stick together and look more authentic.
How long does an easy dirt cake need to sit in the refrigerator?
This no-bake dirt cake needs a minimum of 2-3 hours in the refrigerator to properly chill and set. However, for the best results, refrigerate overnight. The longer chilling time allows the pudding layers to firm up, the cream to fully stabilize, and the cookie crumbles to soften slightly while absorbing chocolate flavors. This is actually one of the advantages of making this dessert ahead.
Can I use homemade pudding instead of instant mix for my chocolate dirt cake?
Yes, you can! Make your own chocolate pudding from scratch using cocoa powder, sugar, cornstarch, milk, and butter. However, you’ll need to let it cool completely before layering, which adds time to your project. Instant pudding is convenient and specifically formulated to set properly in this type of layered dessert, so it’s the better choice for a quick homemade dirt cake. If using homemade pudding, you may need to add an extra 30 minutes to the chilling time.
Is this kids dirt cake recipe safe for children with nut allergies?
The basic classic dirt cake recipe using Oreos and chocolate pudding is naturally nut-free, making it safe for children with nut allergies. However, always check your specific brands for allergen warnings, as some chocolate pudding mixes or cookies may be processed in facilities with nuts. If making variations, be especially careful with peanut butter versions. When serving at parties, always inform guests about ingredients so they can make safe choices for their children.
Can I make this chocolate dirt cake in individual cups instead of a large bowl?
Yes! This is actually an excellent way to serve a classic dirt cake recipe, especially for parties or meal prep. Layer ingredients in clear mason jars, parfait glasses, or disposable cups using the same ratio of ingredients. Individual cups actually look more elegant when served and make portion control easier. You can prepare these up to 24 hours ahead and refrigerate. Just be sure to layer starting from the bottom of each cup and top with cookie crumbles right before serving to keep them crunchier.
Final Thoughts
Making a classic dirt cake recipe has become one of my favorite dessert traditions, and I hope it becomes one of yours too. The combination of simple ingredients, straightforward preparation, and impressive presentation makes this chocolate dirt cake perfect for any occasion—from casual family dinners to elaborate dinner parties or children’s celebrations. The fact that there’s no baking involved means you can create this homemade dirt cake even on the busiest days, and the no-bake dirt cake nature makes it ideal for avoiding heating up your kitchen during warm months.
What I love most about this easy dirt cake is how it brings joy to people of all ages. Kids find the concept delightful and love helping layer the pudding and cookies, while adults appreciate the nostalgic charm and rich chocolate flavors. Whether you stick with the traditional dirt cake with crushed oreos or venture into creative variations like the brownie or mint chocolate versions, this dessert never fails to impress. Make it ahead, customize it to your preferences, and watch your guests delight in every spoonful of this timeless treat.
Ready to Try It?
Ready to make your own classic dirt cake recipe? Head to your pantry, gather these simple ingredients, and start layering! Whether you’re preparing this chocolate dirt cake for a special occasion or just because, I promise it will become a requested dessert in your home. Don’t forget to tag us on social media with your dirt cake creations—I’d love to see your beautiful layers and hear how your family enjoys this delightful no-bake dessert. Happy serving!